Table of Contents
Tired of navigating crowded gyms or just plain short on time? Building a strong, sculpted upper body doesn't require fancy equipment or a monthly membership fee. Forget the excuses. You can absolutely smash an effective chest and shoulders workout without leaving your living room. We're talking about pushing past plateaus and forging impressive strength right where you are. This guide cuts through the noise, showing you exactly how to execute a powerfulat home chest and shoulders workoutthat actually delivers results.
Warmup Right: Preparing for Your At Home Chest and Shoulders Workout

Warmup Right: Preparing for Your At Home Chest and Shoulders Workout
Alright, let's talk warm-ups. Skipping this part before yourat home chest and shoulders workoutis like trying to drive a cold engine at top speed – you're just asking for trouble. Seriously, rolling out of bed and straight into push-ups is a recipe for a pulled muscle that'll sideline you for days. We're not just trying to break a sweat here; we're prepping the joints, getting blood flowing to those crucial chest and shoulder muscles, and telling your body it's time to work, not just lounge on the couch. A proper warm-up isn't some optional extra; it's the non-negotiable entry ticket to actually benefiting from your session and avoiding that dreaded post-workout ache that isn't the "good" kind.
Bodyweight Basics: Core Moves for Your At Home Chest and Shoulders Workout

Bodyweight Basics: Core Moves for Your At Home Chest and Shoulders Workout
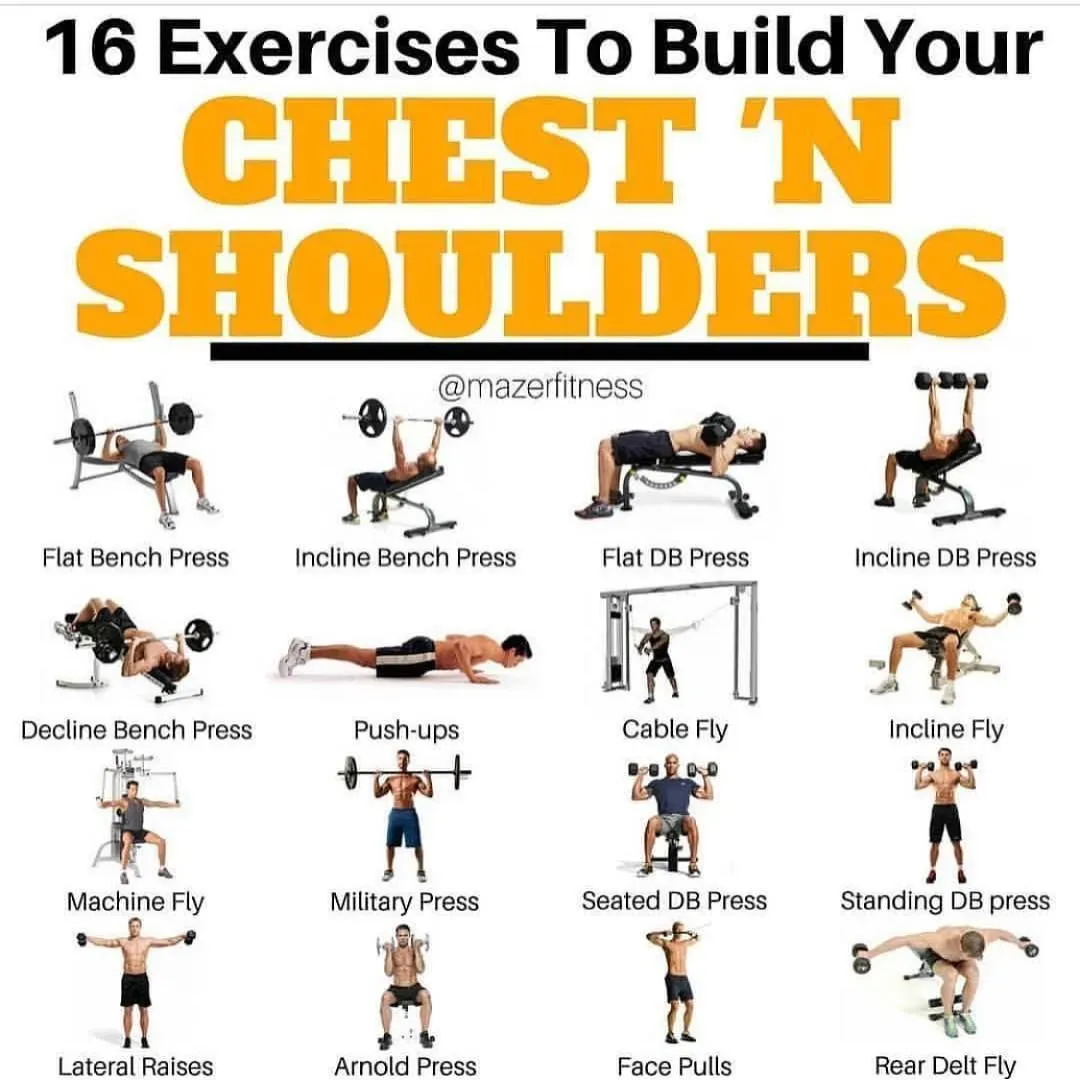
The Mighty Push-Up: Your Foundation
let's get down to brass tacks. When you talk about an effectiveat home chest and shoulders workoutwithout any gear, the push-up is king. It's the bedrock. It works your chest, shoulders, triceps, and even your core if you do it right. Don't think they're too easy or too hard – there's a variation for everyone. If a standard push-up on the floor is too much right now, elevate your hands on a sturdy chair, a table, or even a wall. The higher the hands, the easier it is. Master the form first: hands shoulder-width apart, body straight as a board, lower your chest until it's close to the floor, then push back up. Control is key, not speed. No worming your body up and down – keep that core tight.
Hitting Shoulders with Pike Push-Ups and Dips
While standard push-ups hit the front of your shoulders, we need to target those deltoids more directly. Enter the pike push-up. Get into a push-up position, then walk your feet forward and lift your hips up into an inverted V shape. Your hands should be shoulder-width apart, and your head should be tucked slightly, aiming towards the floor between your hands. Lower your head towards the floor by bending your elbows, then push back up. This shifts the focus heavily onto your shoulders. For the lower chest and front shoulders, parallel bar dips are fantastic, but you can replicate this at home using two sturdy chairs. Place the chairs back-to-back, grip the backs, and lower your body between them. If that's too tough, start with bench dips using a single chair, targeting the back of your arms and shoulders.
- Push-up variations: Standard, Incline (hands elevated), Decline (feet elevated), Kneeling
- Shoulder focus: Pike Push-ups, Wall Handstands (advanced), Chair Dips
- Aim for controlled movements, feeling the muscle work.
- Quality reps beat quantity every time.
Progressing Your Bodyweight Power
Once you can comfortably crank out 10-15 clean reps of a bodyweight exercise, it's time to make it harder without adding weight. For push-ups, try variations like diamond push-ups (hands close together to hit triceps and inner chest), decline push-ups (feet on a chair), or even one-arm push-ups (start with hands on a wall or elevated surface). For pike push-ups, you can try elevating your feet on a chair to increase the angle and resistance. Another way to increase difficulty is by slowing down the tempo, especially the lowering phase (the eccentric part). Try lowering for 3-4 seconds on each rep. This time under tension is brutal in the best way and forces your muscles to adapt.
Adding Weight: Elevating Your At Home Chest and Shoulders Workout with Gear

Adding Weight: Elevating Your At Home Chest and Shoulders Workout with Gear
Adding Weight: Elevating Your At Home Chest and Shoulders Workout with Gear
so bodyweight is fantastic, a true foundation builder. But let's be real, at some point, you might want to add a little extra resistance to keep making gains during yourat home chest and shoulders workout. Good news: you don't need a full dumbbell rack. Look around your place. Got a backpack? Fill it with books or water bottles for added weight during push-ups or even improvised overhead presses. Resistance bands are another low-cost, high-impact option; they're light, portable, and provide tension through the entire range of motion for chest presses, flies, and shoulder raises. Even gallon jugs of water or laundry detergent bottles can serve as makeshift dumbbells for exercises like shoulder presses or front raises. The point is, creativity goes a long way before you need to invest in dedicated weights.
What household items can you use for extra resistance?
- Backpack filled with books or water
- Gallon jugs of water or milk
- Heavy duty shopping bags (carefully!)
- Laundry detergent bottles
- Resistance bands (worth the small investment)
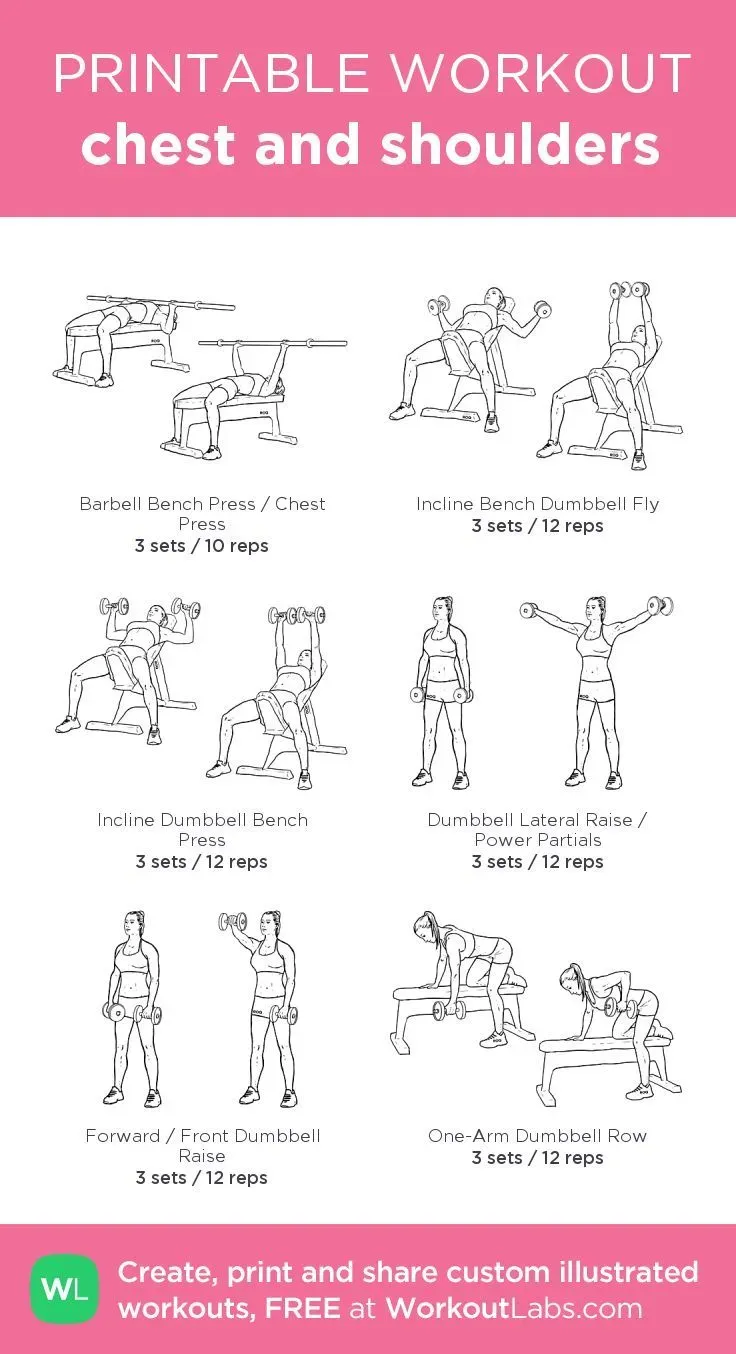
Building Your Session: A Sample At Home Chest and Shoulders Workout Routine
Building Your Session: A Sample At Home Chest and Shoulders Workout Routine
Putting the Pieces Together for Your At Home Routine
Alright, we've talked warm-ups, bodyweight moves, and adding resistance. Now, let's actually build a session. Think of this as putting together a solid meal – you need the right ingredients in the right amounts. For yourat home chest and shoulders workout, you want to hit the muscles from different angles and with varying intensity. Don't just do 100 push-ups and call it a day. A balanced routine mixes compound movements (like push-ups that work multiple muscles) with isolation work (like lateral raises that focus more on just the shoulder). The goal is to fatigue the muscles effectively and safely.
Here’s a basic structure you can follow, mixing bodyweight and potentially added resistance:
- Start with a compound chest exercise (e.g., standard push-ups or incline push-ups).
- Move to a compound shoulder exercise (e.g., pike push-ups or overhead press with weight).
- Include a chest isolation move (e.g., resistance band chest flies or floor presses with weight).
- Add a shoulder isolation move (e.g., lateral raises with weight or resistance band front raises).
- Finish with an exercise that hits both or works stabilizing muscles (e.g., plank variations or chair dips).
Structuring Sets, Reps, and Progression
Now that you have the exercises, how many should you do? A good starting point for building muscle strength and size is aiming for 3-4 sets of 8-15 repetitions per exercise. If you can easily do more than 15 reps with good form, it's time to make the exercise harder – either by choosing a tougher variation, adding more weight, or slowing down the tempo. Rest for about 60-90 seconds between sets to allow your muscles to recover slightly before the next effort. Listen to your body, but push yourself. The last couple of reps in each set should feel challenging, like you're really working for them. Consistency beats intensity initially, but you need to apply progressive overload over time – making the workout harder as you get stronger – to keep seeing results from yourat home chest and shoulders workout.
Beyond the Burn: Avoiding Mistakes and Staying Consistent
Beyond the Burn: Avoiding Mistakes and Staying Consistent
Sidestepping Common Pitfalls
So you're crushing yourat home chest and shoulders workout. That's fantastic. But let's pump the brakes for a second. Enthusiasm is great, but it can lead to some classic errors that derail progress or, worse, cause injury. One big one? Ego lifting with household objects. Just because you *can* lift that overflowing laundry basket doesn't mean you *should* use it for overhead presses with questionable form. Prioritize technique over how much weight you're moving, especially when you're using unconventional gear. Another frequent flub is rushing through reps. Squeezing out quick, jerky movements cheats your muscles out of the work and increases injury risk. Slow it down, control the weight (or your body), and feel the muscle contracting. And please, for the love of all that is holy, don't skip your warm-up or cool-down. Your joints and muscles will send you a strongly worded letter later if you do.
Making It Stick: Consistency is King
Getting hyped for a new workout is easy. Sticking with it when life gets messy? That's the real challenge. Consistency is the secret sauce to seeing actual changes from your at home chest and shoulders workout. Don't aim for perfection; aim for persistence. It's better to get in three decent 20-minute sessions a week than one epic hour-long session followed by two weeks of nothing. Schedule your workouts like you would any other important appointment. Find a time that works for you – first thing in the morning before distractions pile up, or maybe during a lunch break. Track your progress, even if it's just noting how many reps you did or if you used slightly heavier water jugs. Seeing that you're getting stronger is a powerful motivator. And hey, find a workout buddy, even a virtual one, to help keep you accountable. Misery loves company, and so does sweat.
Common workout pitfalls to avoid:
- Poor form over quantity or weight.
- Skipping warm-ups and cool-downs.
- Not progressing the exercises as you get stronger.
- Working out too often without rest days.
- Getting discouraged by slow progress (it's a marathon, not a sprint).
Your At-Home Upper Body Journey
Look, building a strong chest and shoulders at home isn't some mythical feat. It takes consistent effort and smart exercise selection, just like any other training program. You've got the tools – your body, potentially a few basic items – and now you have a framework. Stop waiting for the perfect gym scenario and start putting in the work where you are. Results follow action, not intention. Stick with it, push yourself safely, and watch the progress unfold.