Table of Contents
Alright, let's talk about that stubborn upper chest area. You want that sculpted look, the kind that actually shows when you're wearing a t-shirt, but hitting the gym feels like another chore on a never-ending list. Maybe you're short on time, hate waiting for equipment, or just prefer the comfort of your own space. Whatever the reason, building a powerful upper chest doesn't require a fancy gym membership or racks of heavy weights.
Essential Bodyweight At Home Workouts for Upper Chest
Essential Bodyweight At Home Workouts for Upper Chest
Mastering the Incline Push-Up
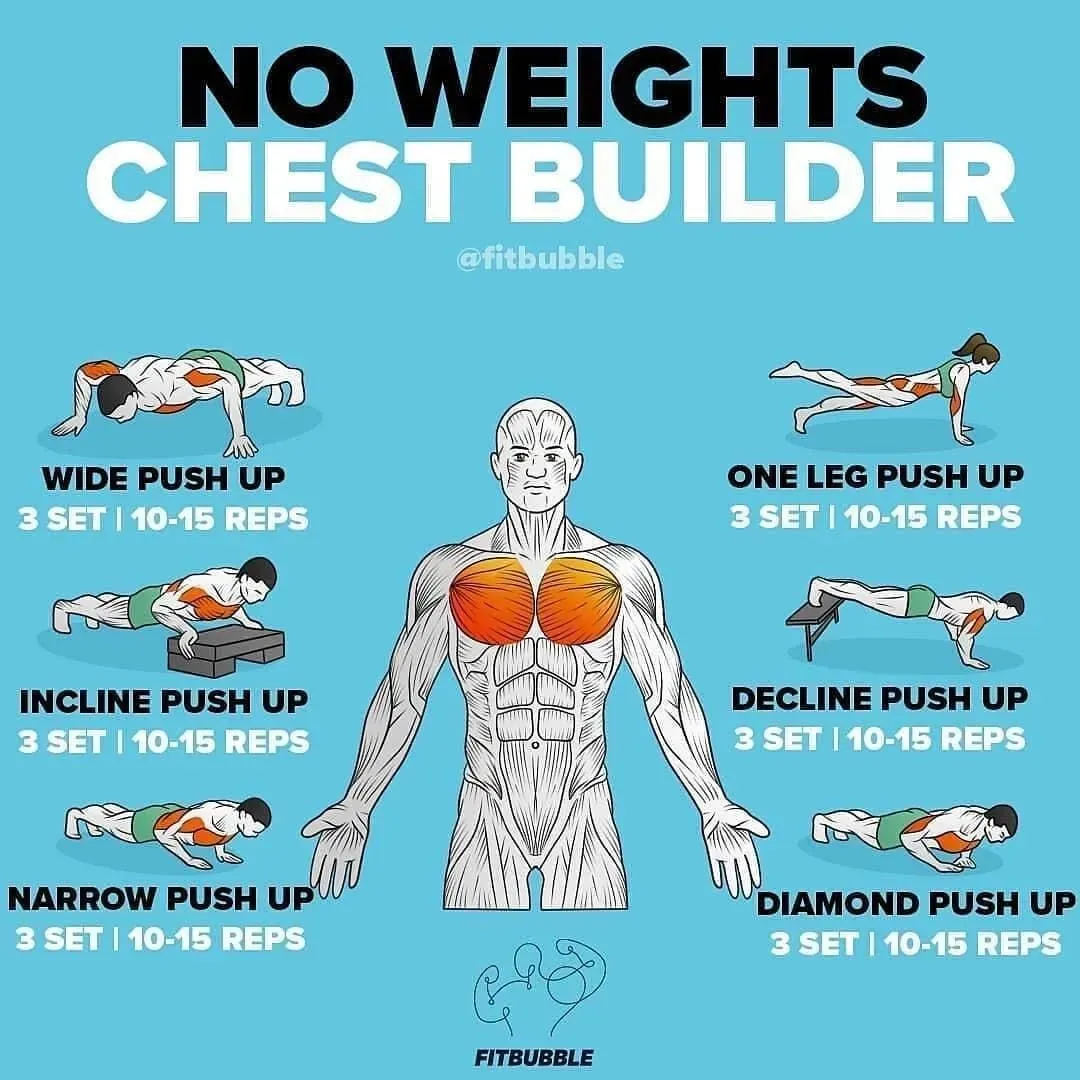
so you want to build that upper chest without any equipment? The incline push-up is your absolute best friend. Think about it: a regular push-up works your whole chest, but by elevating your hands, you shift the focus upwards. It's like doing a decline press at the gym, but using your own weight against gravity.
Find a sturdy surface – a table, a chair, a counter top. The higher the surface, the easier it is, which is great for beginners. Get into a push-up position with your hands on the elevated surface, slightly wider than shoulder-width. Keep your body straight from head to heels, like a plank. Lower your chest towards the edge of the surface, feeling that stretch high up in your pecs. Push back up powerfully. That controlled negative (lowering phase) is key here, so don't just drop.
Hitting Angles with Decline Push-Ups
Now, if you're feeling strong and want to ramp it up, let's flip the script and go for decline push-ups. This is where your feet are higher than your hands. It increases the resistance because more of your body weight is pressing down. This variation seriously targets the upper chest fibers, mimicking an incline press with free weights.
You'll need something stable to put your feet on – a chair, a bench, even a stack of sturdy books. Get into a push-up position with your hands on the floor and your feet elevated. Again, keep that solid plank form. Lower your chest towards the floor, focusing on controlled movement. Push explosively back to the start. If this is too tough initially, start with a lower elevation for your feet and work your way up.
Here are a few key points for bodyweight upper chest moves:
- Focus on mind-muscle connection; really squeeze your upper chest at the top of the movement.
- Control the descent (negative) for better muscle fiber activation.
- Keep your core tight to maintain a straight body line and prevent sagging.
- Vary your hand placement slightly (wider or narrower) to feel different parts of the chest engage.
Adding Intensity with Pike Push-Ups
Want another killer bodyweight move for the upper chest and shoulders? The pike push-up is fantastic. It puts your body in an inverted V shape, with your hips high in the air. This position shifts the load significantly onto your upper chest and shoulders, making it a great progression towards handstand push-ups down the line.
Start in a regular push-up position, then walk your feet closer to your hands while lifting your hips towards the ceiling. Keep your legs relatively straight (a slight bend is okay if needed) and your back flat. Your body should look like an upside-down 'V'. Lower your head towards the floor by bending your elbows, aiming to touch the crown of your head lightly between your hands. Push back up powerfully. This is challenging, so don't get discouraged if you can only do a few reps with good form at first. These Essential Bodyweight At Home Workouts for Upper Chest are about consistency and progression.
Adding Resistance: Bands and Dumbbells for Upper Chest At Home
Adding Resistance: Bands and Dumbbells for Upper Chest At Home
Pump Up Your Upper Chest with Resistance Bands
so you've crushed the bodyweight stuff and you're ready for more? Resistance bands are your secret weapon for adding resistance to your at home workouts for upper chest without needing a ton of space or equipment. They provide tension throughout the entire movement, which is different from free weights where the tension can sometimes drop off at the top.
Think about band incline presses. Anchor the band low, maybe around your feet or a sturdy piece of furniture. Grab an end in each hand, lie back on the floor or an elevated surface (like a bench or even some stacked cushions), and press upwards at an incline angle, just like you would with dumbbells. You'll feel that constant pull, forcing your upper chest fibers to work overtime. Band flyes on an incline are another killer; anchor the band low and perform a fly motion upwards and inwards, squeezing hard at the top. The beauty here is you can easily adjust the resistance by choosing a thicker band or altering your grip.
Dumbbells Aren't Just Doorstops: Upper Chest Moves
Got a pair of dumbbells gathering dust? Excellent. They are fantastic for adding significant resistance to your at home workouts for upper chest. Unlike bands, they provide consistent weight throughout the range of motion, which is crucial for building muscle mass.
Incline dumbbell press is the obvious go-to. If you have an adjustable bench, set it to an incline. If not, get creative. Stack some sturdy books or use a firm pillow to create a slight incline on the floor or a stable surface. Lie back with dumbbells in hand, palms facing each other or slightly rotated, and press them upwards and slightly together over your upper chest. Another great one is incline dumbbell flyes. Lie on your incline setup and, with a slight bend in your elbows, lower the dumbbells out to the sides in an arc, feeling the stretch across your upper chest. Bring them back up using your chest muscles, stopping just short of them touching at the top.
Here's a quick comparison:
Resistance Type | Pros for Upper Chest | Cons |
|---|---|---|
Resistance Bands | Variable tension, portable, easy on joints, great for finishing sets. | Can feel less stable for heavy lifting, need anchor points. |
Dumbbells | Consistent weight, easy to track progress, versatile for various exercises. | Require space, can be awkward to get into position with heavy weight, limited by weight available. |
Combining Forces for Maximum Upper Chest Gain
Why choose one when you can use both? Combining bands and dumbbells in your at home workouts for upper chest can provide a unique stimulus. For instance, you could do your incline dumbbell presses, and then immediately follow up with band incline flyes as a burnout set. The bands will hit those muscle fibers in a slightly different way and keep the tension high even as you fatigue from the dumbbells.
Another approach is to use bands for added resistance on dumbbell movements. You could loop a band around your back and through your hands while doing dumbbell presses, increasing the resistance as you reach the top of the movement where the band is stretched the most. This technique is called accommodating resistance and it’s a smart way to challenge your muscles throughout the full range of motion. Adding Resistance: Bands and Dumbbells for Upper Chest At Home isn't just about having the tools, it's about how you use them.
Crafting Your Plan: Sample At Home Workouts for Upper Chest
Crafting Your Plan: Sample At Home Workouts for Upper Chest
Setting Your Weekly Strategy for Upper Chest Growth
Alright, you've got the moves down – incline push-ups, band presses, maybe some dumbbell flyes. Now, how do you actually put it all together into a plan that gets results? It's not rocket science, but you can't just randomly do a few sets whenever the mood strikes. Consistency is king, especially when you're working with less external load than a gym. For most people, hitting the upper chest directly 1-2 times a week is plenty, provided you're working hard during those sessions.
Think of it like scheduling important meetings. You wouldn't just show up whenever. Pick specific days. Maybe Tuesday and Friday work for you. Or perhaps you tag it onto the end of a different workout day. The key is making it a non-negotiable part of your week. This structured approach is crucial for effective Crafting Your Plan: Sample At Home Workouts for Upper Chest.
Sample Routines: Mixing and Matching for Results
Let's build a couple of quick sample routines. These are just starting points, feel free to tweak them based on your equipment and current strength level. Remember, the goal is controlled reps and feeling the muscle work.
For a bodyweight-focused day, you might start with 3 sets of incline push-ups, aiming for as many good reps as possible (AMRAP) until form breaks down. Follow that with 3 sets of pike push-ups, again going for AMRAP. Finish with some diamond push-ups (hands close together under your chest) for another 3 sets to hit those inner chest fibers, which also contribute to the upper look.
- **Beginner/Bodyweight Sample:**
- Incline Push-Ups: 3 sets, AMRAP (aim for 10-20+ reps)
- Pike Push-Ups: 3 sets, AMRAP (aim for 5-15+ reps)
- Diamond Push-Ups: 3 sets, AMRAP (aim for 8-15+ reps)
- Rest 60-90 seconds between sets.
If you have bands or dumbbells, you can layer those in. A resistance-focused day could look like this: Start with 3-4 sets of incline dumbbell presses, aiming for 8-12 controlled reps. Then move to 3 sets of incline dumbbell flyes, hitting 10-15 reps, really squeezing at the top. Finish with 3 sets of band incline presses or flyes for higher reps (15-20+), focusing on that peak contraction. This mix provides different types of tension and challenges the muscle fibers in varied ways.
Crafting Your Plan: Sample At Home Workouts for Upper Chest should feel challenging by the last few reps of each set. If it feels easy, you need to increase the difficulty – higher incline/decline, slower tempo, or adding resistance if possible. Don't just go through the motions; make every rep count.
Troubleshooting & FAQs on At Home Upper Chest Workouts

Troubleshooting & FAQs on At Home Upper Chest Workouts
Why Aren't I Feeling It in My Upper Chest?
so you're doing the incline push-ups or the dumbbell presses, but you're only feeling it in your shoulders or triceps. Annoying, right? This is a super common problem with at home workouts for upper chest. Often, it comes down to form and focus. Are your elbows flaring too wide? That puts more strain on the shoulders. Are you letting your hips sag? That kills the chest engagement. The key is the mind-muscle connection. Before you start a set, consciously think about the upper chest fibers contracting. Imagine them pulling your arms together as you push.
Try slowing down the movement, especially the lowering phase. A controlled negative forces the muscle to work harder. Also, experiment slightly with your hand or grip width. Sometimes a slightly wider or narrower grip can make a huge difference in where you feel the exercise. Don't just bang out reps; perform them with intention, squeezing the upper chest at the top of every single rep. If you're using bands, make sure the anchor point is low enough to create that upward pull targeting the upper fibers.
Hitting a Wall: How to Break Through Plateaus
You've been doing your at home workouts for upper chest consistently, maybe seeing some initial progress, but now things feel stuck. Welcome to the plateau, friend. It happens to everyone. Your body is efficient; it adapts to the same old stimulus. To keep growing, you have to keep challenging it. This doesn't necessarily mean just doing more reps forever.
Consider increasing the difficulty. If you're doing incline push-ups on a chair, move to a lower surface or try decline push-ups. If you're using dumbbells, can you increase the weight slightly, even if it means doing fewer reps? You can also manipulate tempo – try a 3-second lowering phase, a pause at the bottom, and an explosive push up. Or, increase the volume by adding an extra set or throwing in a burnout set with bands at the end. Varying the exercises themselves helps too; don't just stick to one or two moves forever. Keep your at home workouts for upper chest fresh to keep your muscles guessing.
Common At-Home Upper Chest Mistakes & Fixes:
- **Mistake:** Rushing reps, no control. **Fix:** Slow down, focus on the muscle working.
- **Mistake:** Elbows flaring out wide. **Fix:** Tuck elbows slightly (around 45 degrees) to protect shoulders and target chest.
- **Mistake:** Hips sagging during push-ups. **Fix:** Engage your core tight like a plank.
- **Mistake:** Doing the same routine every time. **Fix:** Vary exercises, reps/sets, tempo, or add resistance.
FAQ: How Often and How Long for Results?
One question that pops up a lot is, "How often should I do these at home workouts for upper chest?" For most people aiming for muscle growth, hitting the upper chest directly 1-2 times per week is sufficient. This allows for adequate recovery time between sessions. Muscles don't grow when you're working out; they grow when you're resting and recovering. If you're also doing other chest exercises (like flat push-ups or dips), make sure you're not overdoing it. Listen to your body; if you're still significantly sore, take an extra day off or work a different muscle group.
As for how long it takes to see results, that's the million-dollar question, isn't it? The honest answer is, it varies. Genetics play a role, your consistency is a massive factor, your diet and sleep are critical, and how hard you're actually pushing yourself during these at home workouts for upper chest makes a difference. You might start feeling stronger within a couple of weeks. Visible changes? That could take anywhere from 4-8 weeks for noticeable differences, and several months for significant changes. Don't get discouraged if you don't look like a fitness model in a month. Stick with it, focus on progressive overload, and trust the process. It takes time and consistent effort.
Beyond the Basics: Progressing Your At Home Upper Chest Routine
Beyond the Basics: Progressing Your At Home Upper Chest Routine
Making the Familiar Uncomfortable (In a Good Way)
so you've been consistently crushing those incline push-ups and maybe even dipping your toes into decline variations. You're feeling stronger, but the reps are starting to feel a bit too easy. This is exactly what you want! It means you're ready to make things harder. Progression isn't always about finding a totally new exercise; sometimes it's about tweaking the ones you already do in your at home workouts for upper chest.
Think about adding weight to your bodyweight moves. Got a backpack? Load it up with books or water bottles. Even 5-10 extra pounds can make a standard push-up significantly more challenging. You can also slow down the tempo dramatically. Try a 5-second descent on your incline push-ups, pause for a second at the bottom, and then push up. This increases time under tension, a key factor for muscle growth. Another simple trick? Reduce rest time between sets. If you were resting 90 seconds, drop it to 60 or even 45. This increases the overall intensity of your at home workouts for upper chest without adding reps or weight.
Stepping Up to More Demanding Variations
Once you've milked the standard variations and tempo tricks, it's time to explore more advanced bodyweight movements that inherently target the upper chest with greater intensity. Enter the pseudo planche push-up. This beast involves leaning your body forward over your hands, shifting more weight onto your chest and shoulders and seriously engaging those upper fibers. Start with a slight lean and gradually increase how far forward you position your shoulders over your hands as you get stronger. It's a humbling move, but incredibly effective.
Another progression is working towards elevated pike push-ups. If regular pike push-ups are becoming easy, elevate your hands on sturdy blocks or benches. This increases the range of motion, allowing you to lower your head further down and put an even greater stretch and load on the upper chest and shoulders. These aren't easy, and they take time to build up to, but they offer a serious challenge for your at home workouts for upper chest without needing a gym.
Ready to push harder?
- Add external weight (weighted vest, backpack).
- Slow down eccentric phase (lowering).
- Pause at the bottom of the movement.
- Reduce rest intervals between sets.
- Increase range of motion (elevated hands/feet).
- Try advanced variations like pseudo planche push-ups.
Consistency, Fuel, and Listening to Your Body
Beyond just the exercises themselves, true progression in your at home workouts for upper chest hinges on a few other critical factors that often get overlooked. Consistency isn't just showing up; it's about hitting your planned sessions week after week, even when you don't feel like it. Sporadic effort yields sporadic results. Make those scheduled workout times non-negotiable appointments with yourself.
What you eat and how much you sleep also directly impact your ability to recover, build muscle, and progress. Are you getting enough protein to repair those muscle fibers you're breaking down? Are you getting 7-9 hours of quality sleep? Muscle growth happens during recovery, not during the workout. Finally, listen to your body. Pushing through minor discomfort is one thing, but ignoring sharp pain or persistent soreness is a fast track to injury, which completely derails all progress. Learn the difference and don't be afraid to take an extra rest day or modify an exercise if something feels off. Sustainable progress means respecting your body's signals.
Final Reps: Sticking with At Home Upper Chest Training
So, there you have it. Building your upper chest doesn't require a pilgrimage to a crowded gym or dropping serious cash on equipment. We've covered bodyweight options, adding resistance, structuring your sessions, and dealing with the usual questions. The path to a stronger upper chest at home isn't paved with magic pills or overnight transformations; it's built with consistent effort and smart exercise selection. Pick a few movements, stick with them, focus on form, and progressively challenge yourself. It might not happen as fast as the influencers promise, but showing up and doing the work, rep after rep, is what actually gets results.