Table of Contents
Staring at your living room carpet, maybe you've wondered if building a respectable chest is even possible without racks of weights and fancy machines. The standard line often suggests you need a commercial gym setup to see real pecs development. That's a convenient narrative for gym owners, isn't it? But what if you're short on time, cash, or just prefer the comfort of your own space?
Why Bother with At Home Workouts for Your Chest?
Why Bother with At Home Workouts for Your Chest?
The Myth of the Mandatory Gym
Look, the fitness industry loves telling you that you need their expensive equipment and shiny floors to get results. Especially for something like chest development, the image is often barbells loaded with plates and pec deck machines. It's a compelling picture, and it makes sense why people buy into it. They see the guys benching serious weight and think, "Ah, that's the secret sauce." But honestly, that narrative is often oversold. Your chest muscles don't know if the resistance comes from a fancy machine or just your own body pushing against the floor. What they respond to is tension, effort, and progressive challenge.
Thinking you *can't* build a strong, visible chest without a gym membership is just limiting your options. It’s like saying you can't cook a good meal without a professional kitchen. Sure, the tools can help, but the skill and the fundamentals are what really matter. Mastering your own bodyweight is arguably a more functional kind of strength anyway. So, why bother with at home workouts for your chest? Because they work, and they cut out the excuses.
Convenience, Cost, and Control
Let's talk logistics. Driving to the gym, finding parking, waiting for equipment, wiping down benches – it all adds up. Time is a finite resource, and frankly, spending an hour commuting and navigating a crowded gym when you could be done in 30 minutes at home feels a bit inefficient, doesn't it? At home workouts for your chest eliminate that friction. You roll out of bed, throw on some shorts, and you're ready to go. No commute, no membership fees, no waiting.
Beyond the practicalities, there's the element of control. You pick the music, you control the temperature, and you don't have to deal with someone doing bicep curls in the squat rack. It's your space, your rules. This level of convenience and autonomy makes it much easier to stay consistent, which is the real key to seeing any results, chest included. It removes those little barriers that make skipping a workout just a little too easy.
- Save time: No commute, no waiting for equipment.
- Save money: No gym membership fees or gas costs.
- Work out any time: Fits your schedule, not the gym's hours.
- Privacy: Train without feeling self-conscious.
- Consistency: Easier to stick to a routine when it's steps away.
Essential At Home Workouts for Your Chest: No Gym Needed
Essential At Home Workouts for Your Chest: No Gym Needed
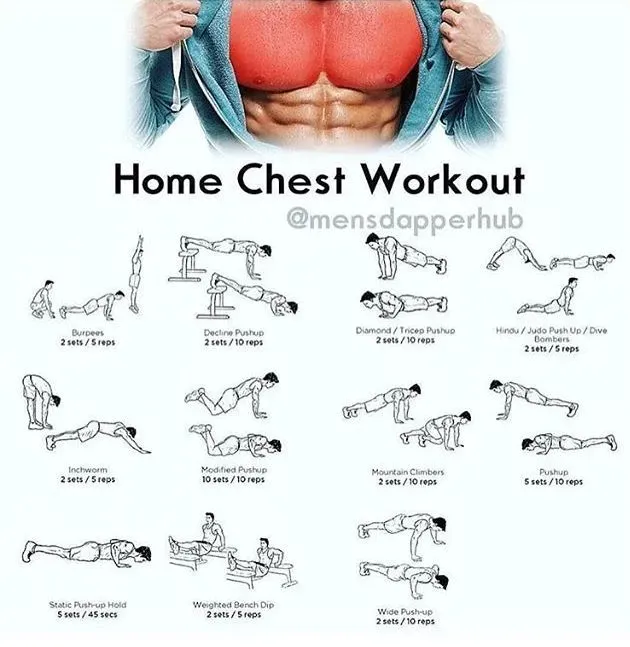
Mastering the Push-up: Your Foundation
Alright, let's get down to brass tacks. When you talk about at home workouts for your chest, the push-up is king. Period. It's the most fundamental movement you have available, working your chest, shoulders, and triceps all at once. But don't dismiss it just because it's common. Most people do push-ups poorly, letting their hips sag or flaring their elbows out like confused chickens. A proper push-up keeps your body in a straight line from head to heels, elbows tucked closer to your sides (think 45 degrees, not 90), and you lower your chest until it's just about touching the floor.
Start on your knees if you need to, but work your way up to full push-ups on your toes. The goal isn't just to bang out reps; it's to control the movement, feel the squeeze in your chest at the top, and lower yourself with control. Once standard push-ups get easy – maybe you can do 15-20 solid reps – it's time to think about variations to keep challenging those pecs. Because just doing 50 easy push-ups isn't building much muscle tension.
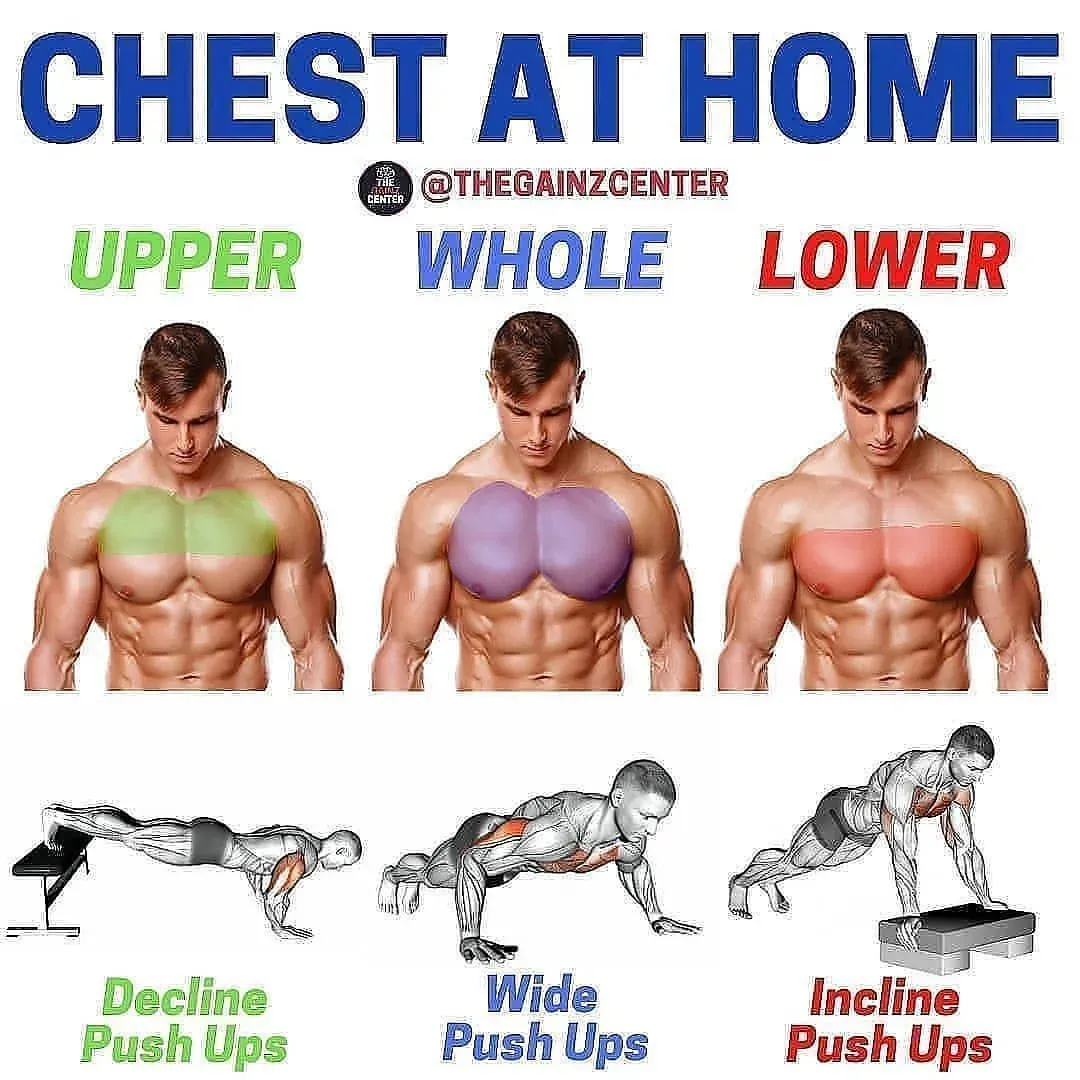
Elevating the Challenge: Feet and Hand Variations
So, standard push-ups feel like a warm-up now? Good. Time to make gravity work against you a bit more. Elevating your feet shifts more of your body weight onto your hands, drastically increasing the difficulty and hitting the lower part of your chest more intensely. Grab a sturdy chair, a coffee table, or even the stairs. The higher your feet, the harder the push-up.
Conversely, elevating your hands (like doing push-ups against a counter or wall) makes them easier, which is perfect for beginners building strength. But for challenging your chest at home, focusing on decline push-ups (feet up) is key for progression. You can also change hand width – wider hits the outer chest more, narrower works the inner chest and triceps harder. Play around with these simple tweaks; they make a world of difference in your at home workouts for your chest.
Push-up Variation | Primary Target Area | Difficulty |
|---|---|---|
Standard Push-up | Overall Chest | Beginner/Intermediate |
Decline Push-up (Feet Elevated) | Lower Chest | Intermediate/Advanced |
Incline Push-up (Hands Elevated) | Upper Chest (easier) | Beginner |
Wide Push-up | Outer Chest | Intermediate |
Narrow/Diamond Push-up | Inner Chest & Triceps | Intermediate/Advanced |
Targeting the Upper Chest: Pike Push-ups and More
Building a well-rounded chest means not neglecting the upper portion, which often lags behind. While decline push-ups hammer the lower chest, pike push-ups start to target the upper chest and shoulders by changing your body angle. Get into a push-up position, then walk your feet forward and lift your hips into an inverted V shape. Your hands should be shoulder-width apart, and you lower your head towards the floor by bending your elbows.
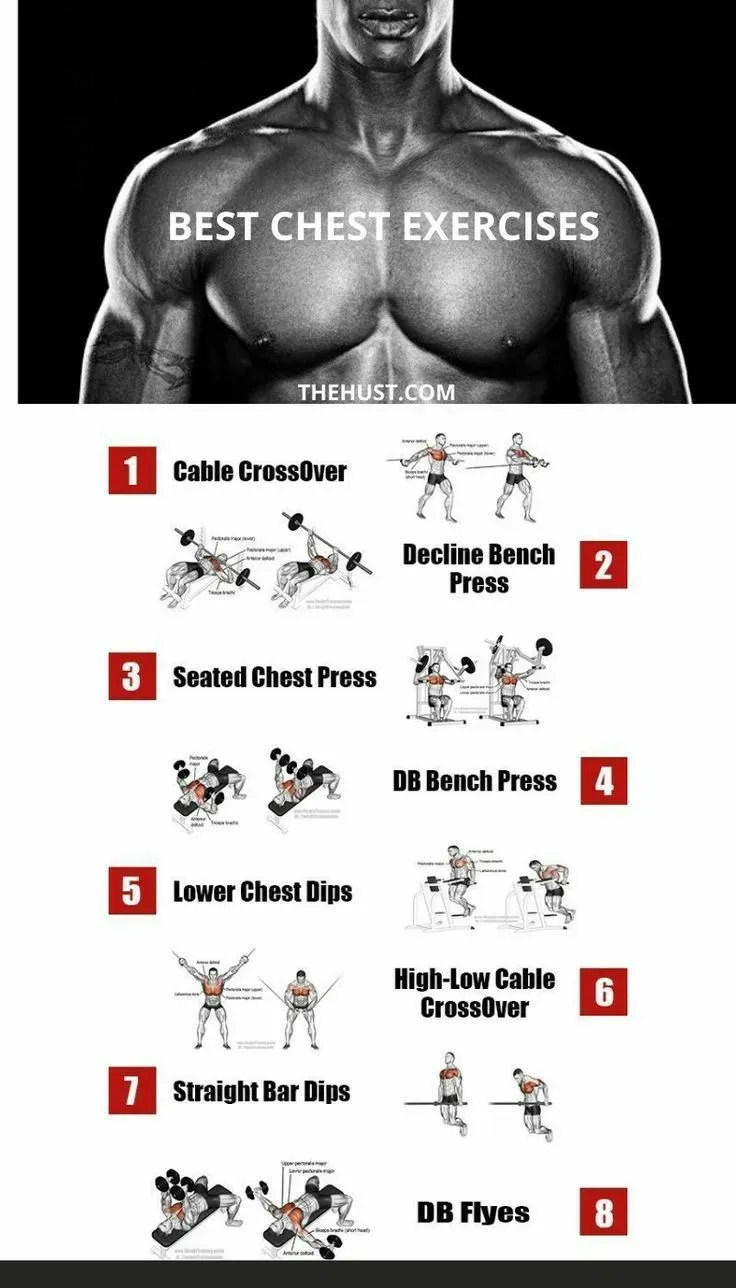
Think of it as a stepping stone towards handstand push-ups, but it's a fantastic move for your at home chest workouts. You can make these harder by elevating your feet (pike push-ups with feet on a chair) or moving closer to a full handstand position. Another great option, if you have two sturdy chairs or parallel bars, is dips. Dips are phenomenal for hitting the lower and outer chest, and they allow for a deeper stretch at the bottom, which can stimulate more growth. Don't have parallel bars? Get creative with sturdy furniture or even the edge of your counter if it's stable enough and you can safely support your weight.
Crafting Your At Home Chest Workout Routine

Crafting Your At Home Chest Workout Routine
Picking Your Battles: Exercise Selection and Order
Alright, so you know the basic moves: push-ups in various forms, maybe dips if you're feeling ambitious and have the setup. Crafting Your At Home Chest Workout Routine starts with picking the right tools from your limited toolbox. You don't need a dozen different exercises. Focus on compound movements that hit multiple angles of the chest. Start with the hardest exercise first when you're freshest. For many, that's decline push-ups or even pike push-ups if upper chest is a priority.
After that, move to standard push-ups. Think about hitting different angles: maybe a set with hands slightly wider, then a set with hands closer. If you have rings or suspension straps, push-ups on those add a whole new level of instability and challenge. The point is to select 2-4 exercises that allow you to work your chest through a full range of motion and progressively overload it. Don't just do what feels easy; pick moves that make you work for every rep.
Structuring the Pain: Sets, Reps, and Intensity
Once you've got your exercises lined up, how do you actually perform the workout? This isn't rocket science, but it requires a bit more thought than just dropping and giving twenty. For building muscle, you're generally looking at working within a rep range that's challenging – typically 8-15 reps per set, maybe a bit higher if the exercise is easier for you. The key is to push close to failure on each set while maintaining good form. If you can easily bang out 20 perfect push-ups, you need a harder variation.
Aim for 3-4 sets per exercise. Rest periods between sets should be long enough to recover and give maximum effort on the next set, but not so long that you cool down completely. 60-90 seconds is a solid starting point. The goal is cumulative fatigue in the muscle. By the end of your workout, your chest should feel thoroughly worked. If it doesn't, you either didn't do enough sets/reps, or the exercises weren't challenging enough for your current strength level. Simple as that.
What's a good starting point for sets and reps?
- Beginner: 3 sets of as many reps as possible (AMRAP) per exercise, focusing on form.
- Intermediate: 3-4 sets, aiming for 10-15 reps, stopping 1-2 reps shy of failure.
- Advanced: 3-4 sets, aiming for 8-12 reps, pushing close to or at failure on the last set. Incorporate harder variations or techniques like tempo or pauses.
Consistency is King: How Often to Train Your Chest
You can have the perfect plan for Crafting Your At Home Chest Workout Routine, but if you only do it once every two weeks, you're essentially spinning your wheels. Muscles grow when they are challenged and then given time to recover and rebuild. For most people, training the chest 2-3 times per week is a sweet spot. This allows for enough frequency to stimulate growth consistently but also provides adequate rest time between sessions.
Listen to your body, though. If you're still significantly sore from a previous chest workout, give it another day. Overtraining won't help you; it will just lead to burnout or injury. Schedule your chest days and stick to them like they're appointments you can't miss. Maybe Tuesday and Friday, or Monday, Wednesday, and Friday if you use lighter sessions. Find a rhythm that fits your life and commit to it. That consistent effort, week after week, is what truly builds the chest you're after with your at home workouts for your chest.
Making Your At Home Workouts for Your Chest Harder Over Time
Making Your At Home Workouts for Your Chest Harder Over Time
Making Your At Home Workouts for Your Chest Harder Over Time
So, you've mastered the basic push-up variations, and you're wondering, " how do I keep getting stronger without adding weight?" This is where the real fun of bodyweight training kicks in. Making Your At Home Workouts for Your Chest Harder Over Time isn't about magically lifting heavier things; it's about manipulating leverage, tempo, range of motion, and volume. Think about it: a one-arm push-up is exponentially harder than a two-arm push-up, right? You didn't add weight, you just changed the mechanics. You can slow down the lowering phase (eccentric), pause at the bottom for a second, or increase the number of reps and sets. You can also decrease rest time between sets to increase intensity. The point is to constantly find ways to challenge the muscle beyond what it did last time, forcing it to adapt and grow.
How can you increase the challenge without adding weights?
- Increase reps per set.
- Increase total sets.
- Slow down the tempo (especially the lowering phase).
- Pause at the bottom of the movement.
- Decrease rest time between sets.
- Move to harder variations (e.g., feet elevated, one-arm progressions).
- Increase the range of motion (e.g., using push-up handles or chairs).
Avoiding Pitfalls in Your At Home Chest Workouts
Avoiding Pitfalls in Your At Home Chest Workouts
Falling into the Form Trap
Look, it’s easy to think you’re doing a push-up when you’re just flailing around on the floor. One of the biggest traps when doing at home workouts for your chest is sacrificing proper form for the sake of hitting a certain number of reps. You see people hyperextending their lower back, letting their hips sag, or doing these tiny, half-rep bounces. That’s not training your chest; that’s just making noise on the floor. Bad form doesn't build muscle; it builds a fast track to an injury.
Focus on quality over quantity, especially when you're starting out or trying a new variation. Keep your body straight, engage your core, and control the movement through the full range of motion. Lower yourself until your chest is close to the ground, and push back up powerfully. If you can only do a few perfect reps, do a few perfect reps. Then regress the exercise (like going to your knees) to finish the set with good form. Your chest muscles respond to tension under control, not sloppy movement.
Ignoring Progression and Recovery
Another common mistake in at home workouts for your chest? Doing the same thing forever and expecting different results. You hit a point where 20 standard push-ups are easy, but you just keep doing 20 standard push-ups. That’s how you plateau. Muscle growth requires progressive overload – constantly challenging the muscle in new ways. If it’s not getting harder over time, it’s not getting better.
Equally important, and often overlooked when training at home without a coach watching, is recovery. Your muscles don't grow when you're working out; they grow when you're resting and fueling them properly. Pushing yourself every single day with high intensity without adequate sleep or nutrition is a recipe for burnout and stagnation. Schedule rest days, eat enough protein, and get your sleep. Skipping recovery is essentially undoing the hard work you put in during your at home workouts for your chest.
- Poor Form: Prioritize quality reps over quantity.
- Lack of Progression: Constantly seek ways to make exercises harder.
- Insufficient Recovery: Rest, sleep, and nutrition are non-negotiable.
- Inconsistency: Sporadic workouts yield sporadic results.
- Neglecting Warm-up/Cool-down: Increase injury risk.
Your At Home Chest: Mission Accomplished
So, there you have it. Building a solid chest doesn't require a pilgrimage to the nearest temple of iron. With smart exercise selection, proper form, consistent effort, and a willingness to adapt, those at home workouts for your chest can deliver tangible results. It won't happen overnight, and there will be days you'd rather just watch TV. But sticking with it, pushing through plateaus with technique tweaks or intensity boosters, proves that your living room is more than just a place to relax. It's a legitimate training ground.