Table of Contents
Want to build a stronger, more muscular chest but don't have access to weights or a gym? Maybe you're just starting out and the idea of a crowded weight room feels a bit much. Forget the fancy equipment and complicated routines. You can absolutely sculpt impressive pecs right from your living room floor. This article lays out a straightforward, effective, 8-week plan designed specifically as a beginner chest workout at home without equipment. We're not promising overnight miracles, but we are giving you a structured path built on solid bodyweight exercises. You'll start by building a base, then progressively increase strength, and finally add a touch of power. We'll walk you through three distinct phases, detailing the exercises, frequency, and focus for each. By the end of this plan, you should see and feel a real difference in your chest strength and definition. Ready to get started without lifting a single dumbbell?
Your 8Week Beginner Chest Workout at Home Without Equipment Starts Here
Your 8Week Beginner Chest Workout at Home Without Equipment Starts Here
Ditching the Weights, Keeping the Gains
Look, hitting the gym isn't for everyone, or maybe it's just not an option right now. That doesn't mean your chest has to look like you've been skipping every push day since forever. Building a solid, strong chest using just your bodyweight is totally achievable, and frankly, pretty impressive. This isn't some fluffy 'try this one weird trick' kind of deal. This is a structured, progressive 8-week plan designed specifically as your Your 8Week Beginner Chest Workout at Home Without Equipment Starts Here. We're talking push-ups, variations you might not have tried, and a focus on getting stronger week after week.
Why Bodyweight Works Wonders
Bodyweight exercises, especially for the chest, are fantastic for beginners. They force you to engage your core and stabilizing muscles much more than a bench press might. You're not just pushing weight; you're controlling your entire body through space. This builds functional strength that translates into everyday life, not just lifting heavier things in a gym. Plus, the risk of injury is generally lower when you're learning the ropes without external loads. It's about mastering the movement first.
- Builds functional strength
- Engages core and stabilizers
- Lower risk of injury for beginners
- Requires zero equipment
- Can be done anywhere, anytime
The Road Ahead: Progress Over 8 Weeks
This isn't just a random collection of push-up variations. We've broken this plan into three distinct phases, each building on the last. You'll start by focusing on endurance and getting comfortable with the basic movements. Then, we'll shift gears to build raw strength by introducing tougher variations and adjusting the volume. Finally, the last couple of weeks will challenge you with more explosive movements. Think of it as a journey from shaky reps to confident, powerful presses. By the end of this 8-week program, your beginner chest workout at home without equipment will feel anything but beginner.
Phase 1: Laying the Foundation (Weeks 12)
Phase 1: Laying the Foundation (Weeks 12)
Getting Started: Mastering the Basics
Alright, week one and two are all about getting acquainted with gravity and figuring out what your chest muscles are actually supposed to do. No ego lifting here, just pure body control. The main player in this phase is the good old push-up, but we're starting smart. Forget trying to crank out fifty shaky reps. The goal is perfect form, building muscle endurance, and getting your body used to the movement pattern. We’ll focus on variations that allow you to control the descent and ascent, feeling the chest work. Think of it as learning to walk before you try to sprint a marathon.
The Weekly Grind: Exercises and Volume
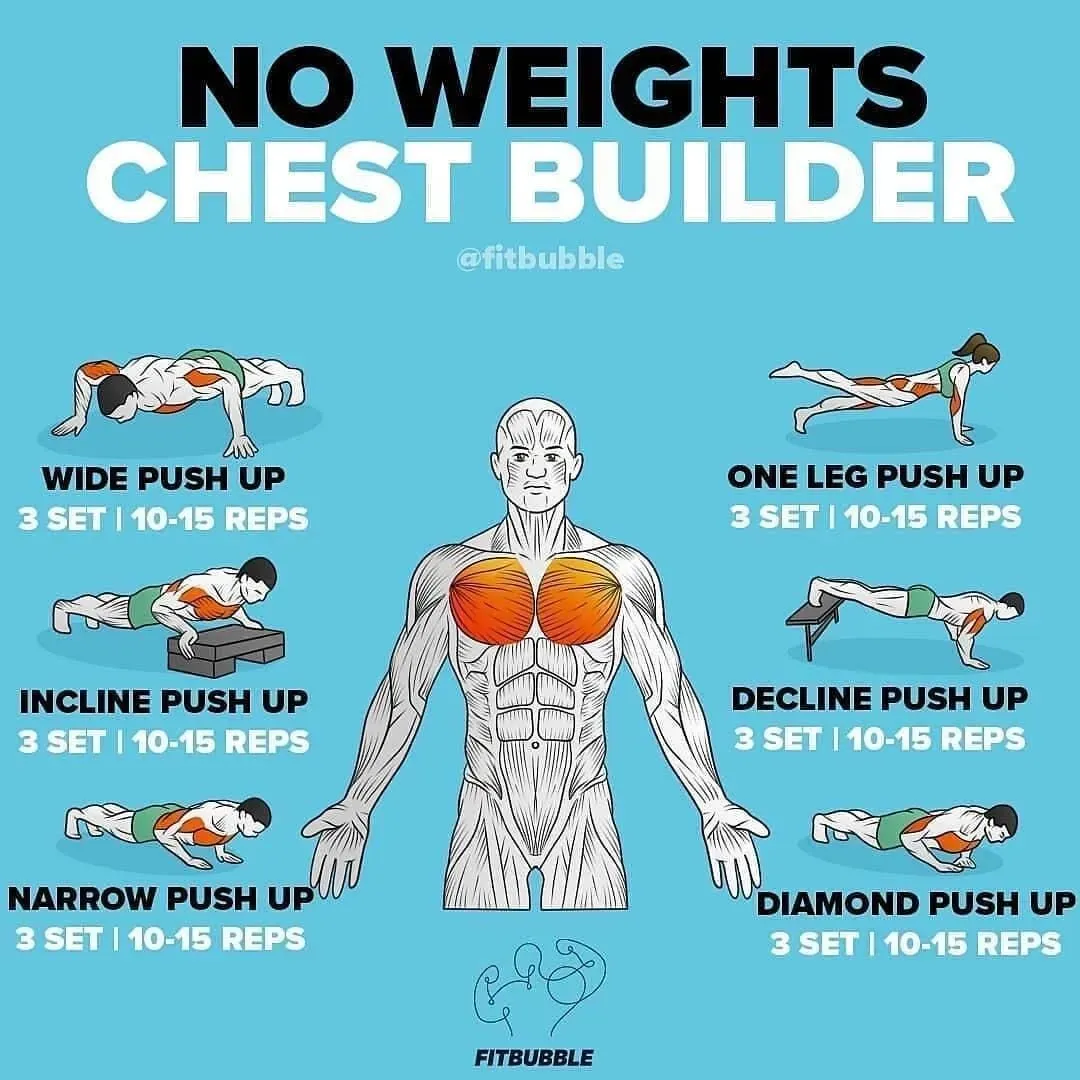
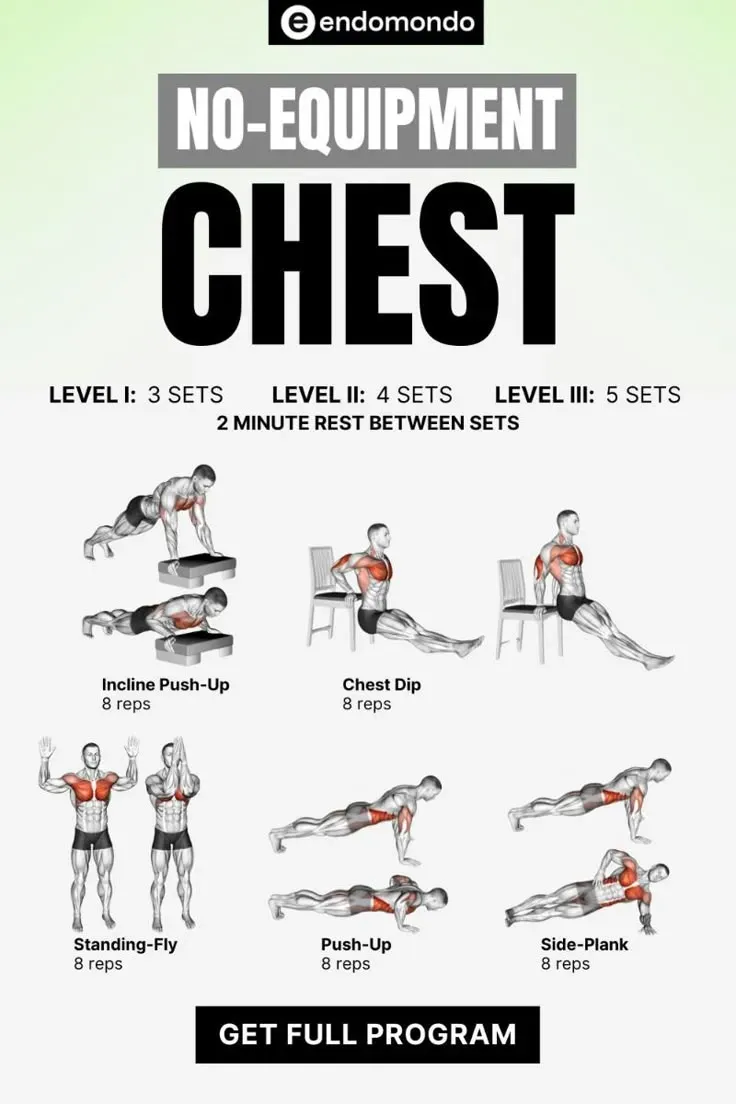
For these first two weeks, you'll hit chest three times a week. Space it out – maybe Monday, Wednesday, Friday – to give your muscles a chance to recover. Don't train through crippling soreness; listen to your body. We're keeping the exercise list short and sweet to really nail the technique. You'll focus on just a couple of key movements. We're aiming for higher rep ranges here because the focus is endurance and building that mind-muscle connection. If you can't do a full push-up on the floor with good form (chest to about a fist-height from the floor, straight back, elbows tucked slightly), start with incline push-ups against a sturdy counter or table. It's not cheating, it's smart training.
- Exercise 1: Incline Push-ups (or standard if form is good)
- Exercise 2: Wall Push-ups (if incline is too hard)
- Exercise 3: Basic Plank (for core stability)
Progressing Smartly and What to Expect
Your sets and reps will look something like 3 sets of as many controlled reps as you can do while maintaining good form, aiming for somewhere between 10-20 reps per set. If you can easily do more than 20 with perfect form, move to a slightly lower incline or the floor variation sooner. The plank is just holding for time, start with 30 seconds and build up. You'll likely be a bit sore after the first few sessions, which is normal. That dull ache means you actually did something. Hydrate, eat some decent food, and get some sleep. Consistency is your best friend in this phase. Just show up, do the work, and focus on making each rep look better than the last.
Phase 2: Building Solid Strength with Bodyweight (Weeks 36)

Phase 2: Building Solid Strength with Bodyweight (Weeks 36)
Upping the Ante: From Endurance to Raw Power
Alright, you survived the first two weeks. The initial soreness is probably gone, and those basic push-ups are starting to feel less like a monumental effort and more like... well, something you can actually do. Good. Because now we shift gears. Weeks 3 through 6 are where we start focusing on building actual strength. This means fewer reps per set, but with exercises that demand more from your muscles. We're graduating from just getting comfortable with the movement to actively challenging your chest fibers to grow. Think of it as moving from lifting light groceries to carrying a slightly heavier load – still manageable, but you feel the work more.
Strategic Strikes: Exercises and Intensity for Weeks 3-6
For this phase, you'll reduce your training frequency slightly to two days a week. Why? Because we're increasing the intensity. Your muscles need a bit more time to recover from the heavier stimulus. We'll introduce variations that put more load on specific parts of your chest or increase the overall difficulty. Standard push-ups should be solid by now, so we'll start incorporating things like diamond push-ups (hands close together, hitting the inner chest) or wide push-ups (hands wider than shoulder-width, targeting the outer chest). The goal isn't high reps anymore. Aim for 3-4 sets of 6-12 controlled, challenging reps. If you can easily do more than 12 of a specific variation with good form, it's time to find a harder variation or slightly elevate your feet for decline push-ups.
- Focus: Building Strength
- Frequency: 2 days per week
- Key Variations: Diamond Push-ups, Wide Push-ups
- Rep Range: 6-12 challenging reps per set
Phase 3: Adding Explosiveness to Your AtHome Chest Workout (Weeks 78)

Phase 3: Adding Explosiveness to Your AtHome Chest Workout (Weeks 78)
Adding Spring to Your Push: Explosiveness in the Final Weeks
weeks seven and eight. You've built the foundation, you've stacked on some serious strength with tougher variations, and now it's time to add some zip. This is where we focus on speed and power, not just grinding out reps. We're talking about moving *fast* against resistance, training your muscles to contract forcefully and quickly. This phase for your Phase 3: Adding Explosiveness to Your AtHome Chest Workout (Weeks 78) isn't about hitting fatigue with slow, controlled negatives. It's about pushing off the floor with enough force that your hands might actually leave the ground for a second. Think of a boxer throwing a punch – it's not just strength, it's speed behind the force.
Beyond the Basics: What Comes After This NoEquipment Chest Routine
Beyond the Basics: What Comes After This NoEquipment Chest Routine
So, You Finished the 8 Weeks. Now What?
Alright, you made it through the initial 8-week gauntlet of this beginner chest workout at home without equipment. Feels pretty good, right? You're likely stronger, have a better handle on bodyweight movements, and maybe even see a bit more definition peeking through. But this isn't the finish line; it's just the end of the beginning. What you do next depends on your goals. Are you hooked on the bodyweight life? Do you want to get ridiculously strong using just your own mass? Or maybe you're curious about adding a little extra challenge? There are a few paths you can take from here, and none of them involve signing up for a pricey gym membership unless you genuinely want to.
Leveling Up Your Bodyweight Game
If sticking with bodyweight is your jam, the next logical step is tackling harder variations. The push-up universe is vast and unforgivingly challenging. You can work towards one-arm push-ups (start with assisted versions against a wall or on an incline), pseudo planche push-ups (shifting your weight forward over your hands), or even dive bomber push-ups. The key is progressive overload – making the exercise harder as you get stronger. This could also mean increasing your volume (more sets, more reps, more frequency, carefully managed) or focusing on slower, more controlled negatives for increased time under tension. Don't just do the same thing faster; make the exercise itself more demanding.
- Work towards one-arm push-ups (start assisted).
- Try pseudo planche push-ups (lean forward over hands).
- Incorporate dive bomber push-ups.
- Increase total sets or reps gradually.
- Slow down the lowering phase for added difficulty.
Exploring New Tools and Goals
While this program was strictly a beginner chest workout at home without equipment, adding minimal, inexpensive gear can open up new possibilities. Resistance bands offer variable tension throughout the movement and are great for adding intensity or assistance. Suspension trainers (like TRX) allow for adjustable difficulty and hit stabilizer muscles hard. Parallel bars or dip stations (even sturdy chairs) let you introduce dips, a cornerstone bodyweight chest exercise. Think about setting performance goals beyond just reps – maybe achieving a certain number of one-arm push-ups, or even working towards calisthenics skills like the planche (a long-term, advanced goal, obviously). Keep challenging yourself; the body adapts quickly once it gets comfortable.
What's Next After 8 Weeks?
You've put in the work over these past eight weeks, tackling the challenge of building chest strength and size using nothing but your own bodyweight. From the foundational endurance of Phase 1 to the explosive power in Phase 3, you've proven that a gym isn't a prerequisite for making progress. This plan was a starting point, a solid introduction to what consistent effort and smart exercise selection can achieve at home. Consider this a baseline. You can revisit this cycle, increase the reps or sets, shorten rest times, or explore more advanced bodyweight variations. The equipment-free path doesn't end here; it just opens up to new possibilities as you get stronger.