Table of Contents
Feeling the itch to build a stronger upper body but staring at an empty room? No weights, no machines, just you and your floor? That’s a common spot to be in. Many people think you need a gym packed with gear to get a decent chest and back session in. They worry about how to target those opposing muscle groups effectively without a bench press or a pull-up bar.
Why Train Chest and Back At Home with No Equipment?
Why Train Chest and Back At Home with No Equipment?
Ditch the Commute, Grab the Floor
Look, life gets messy. Gym memberships cost money, finding time feels impossible, and sometimes you just don't want to leave the house. That's where training your chest and back at home with no equipment becomes a game-changer. You eliminate the excuses. Your living room, bedroom, or even a patch of yard becomes your gym. No waiting for machines, no awkward locker room encounters, just pure, unadulterated training on your schedule. It's about making fitness fit into your life, not the other way around.
Build Real-World Strength and Resilience
Forget fancy gadgets; bodyweight exercises for your chest and back build functional strength. When you do a push-up, you're not just working your chest; you're engaging your core, shoulders, and triceps in a coordinated movement. Similarly, bodyweight rows (using a table or sturdy object) hit your back, biceps, and grip strength simultaneously. This isn't just about looking good; it's about building a body capable of handling everyday tasks with ease. Lifting groceries, moving furniture, playing with your kids – these moves translate directly into real-world capability. It's a practical, no-nonsense approach to getting stronger.
Bodyweight training also forces you to focus on form and body control. There's no weight stack to bail you out if your mechanics are sloppy. This attention to detail helps prevent injuries and builds a solid foundation for more advanced movements down the road. Plus, mastering your own bodyweight is incredibly empowering. It proves you don't need external resistance to challenge yourself and see results.
Key Benefits of No-Equipment Training:
- Ultimate convenience and flexibility
- Zero cost
- Develops functional, integrated strength
- Improves body control and stability
- Reduces reliance on external tools
Getting Started: Warming Up for Your AtHome Workout
Getting Started: Warming Up for Your AtHome Workout
so you're hyped to hit that chest and back workout at home with no equipment, right? Before you drop into your first push-up or find something sturdy for rows, you absolutely cannot skip the warm-up. Think of it like prepping your car before a long drive – you check the tires, the oil, make sure everything's moving smoothly. Your body needs the same respect. A proper warm-up gets your blood flowing, loosens up your joints, and tells your muscles it’s time to work, significantly reducing the risk of pulling something stupidly before you even get to the main event. We're talking about simple, dynamic movements here, nothing complicated, just getting things warm and ready to roll for your chest and back session.
Your GoTo Chest Exercises: No Equipment Required
Your GoTo Chest Exercises: No Equipment Required
Mastering the Push-Up: Your Chest Building Foundation
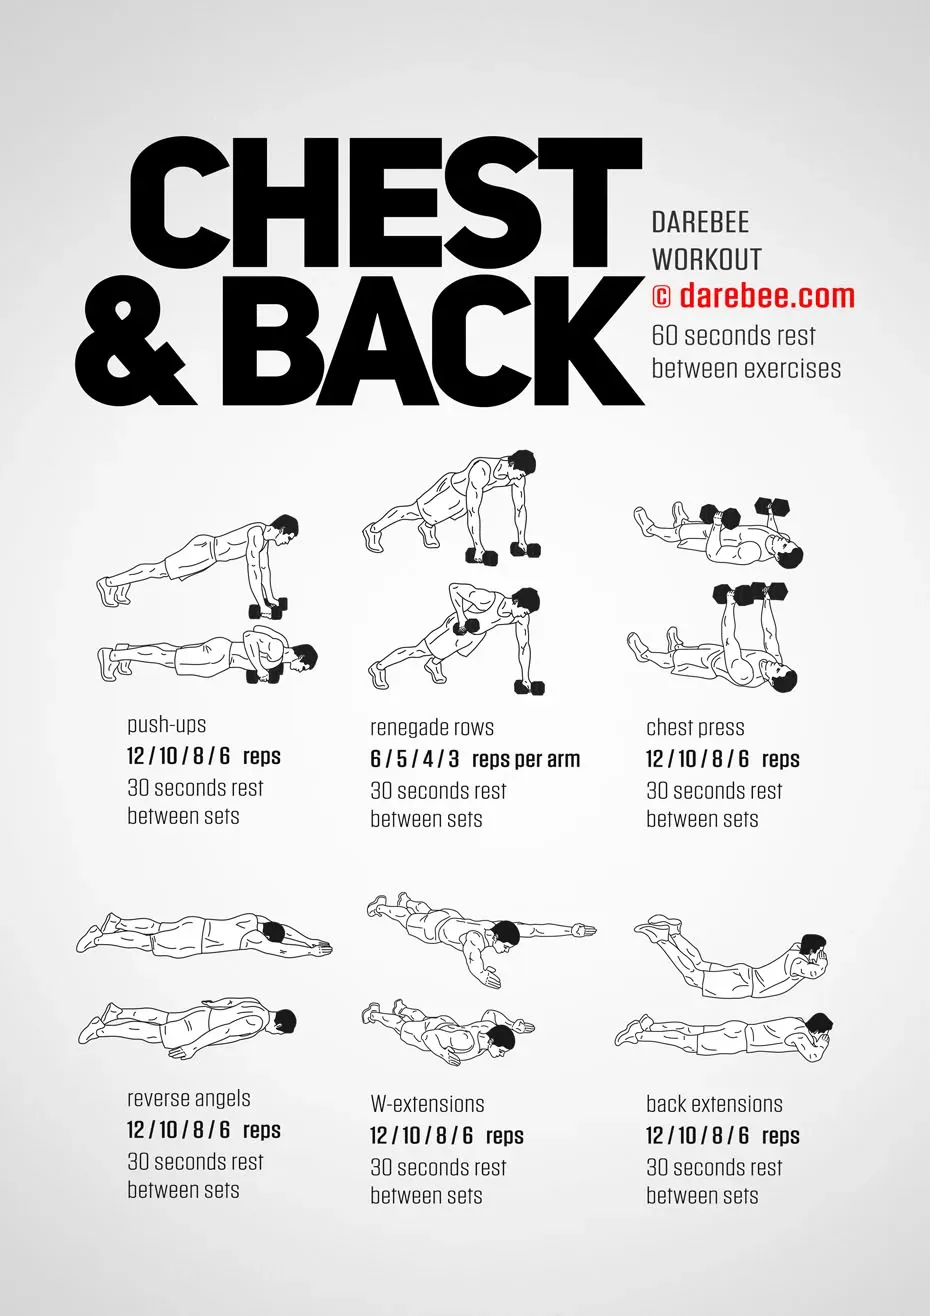
Alright, let's talk chest. When you're doing a chest and back workout at home no equipment, the push-up is your absolute bread and butter. It's a classic for a reason. It hammers your chest, shoulders, and triceps, and you can adjust it to be easier or harder depending on where you're at. Start with your hands slightly wider than shoulder-width, fingers pointing forward, and keep your body in a straight line from head to heels. Lower yourself until your chest is close to the floor, then push back up. Focus on squeezing your chest muscles at the top. Don't let your hips sag or pike up – think plank position that moves up and down.
If a standard push-up is too tough right now, no sweat. Elevate your hands on a sturdy chair, table, or even a wall. The higher the surface, the easier it is. If it's too easy, try putting your feet up on something instead. Play around with hand position too – closer hands work the triceps more, wider hands hit the outer chest. There's a push-up variation for everyone and every fitness level, making it perfect for your chest and back workout at home no equipment plan.
Adding Difficulty and Targeting Different Angles
Once you've got standard push-ups down, it's time to spice things up and hit your chest from different angles, which is key for a comprehensive chest and back workout at home no equipment. Decline push-ups, where your feet are elevated higher than your hands, really target the upper chest. Think about using a chair or even the stairs. Just make sure whatever you use is stable.
Diamond push-ups, with your hands close together forming a diamond shape under your chest, put a lot more emphasis on the triceps but also give your inner chest a serious workout. Then there are variations like one-arm push-ups (aspirational, I know, but worth working towards), or simply slowing down the tempo on your regular push-ups to increase time under tension. Don't be afraid to experiment and see what feels most challenging and effective for you.
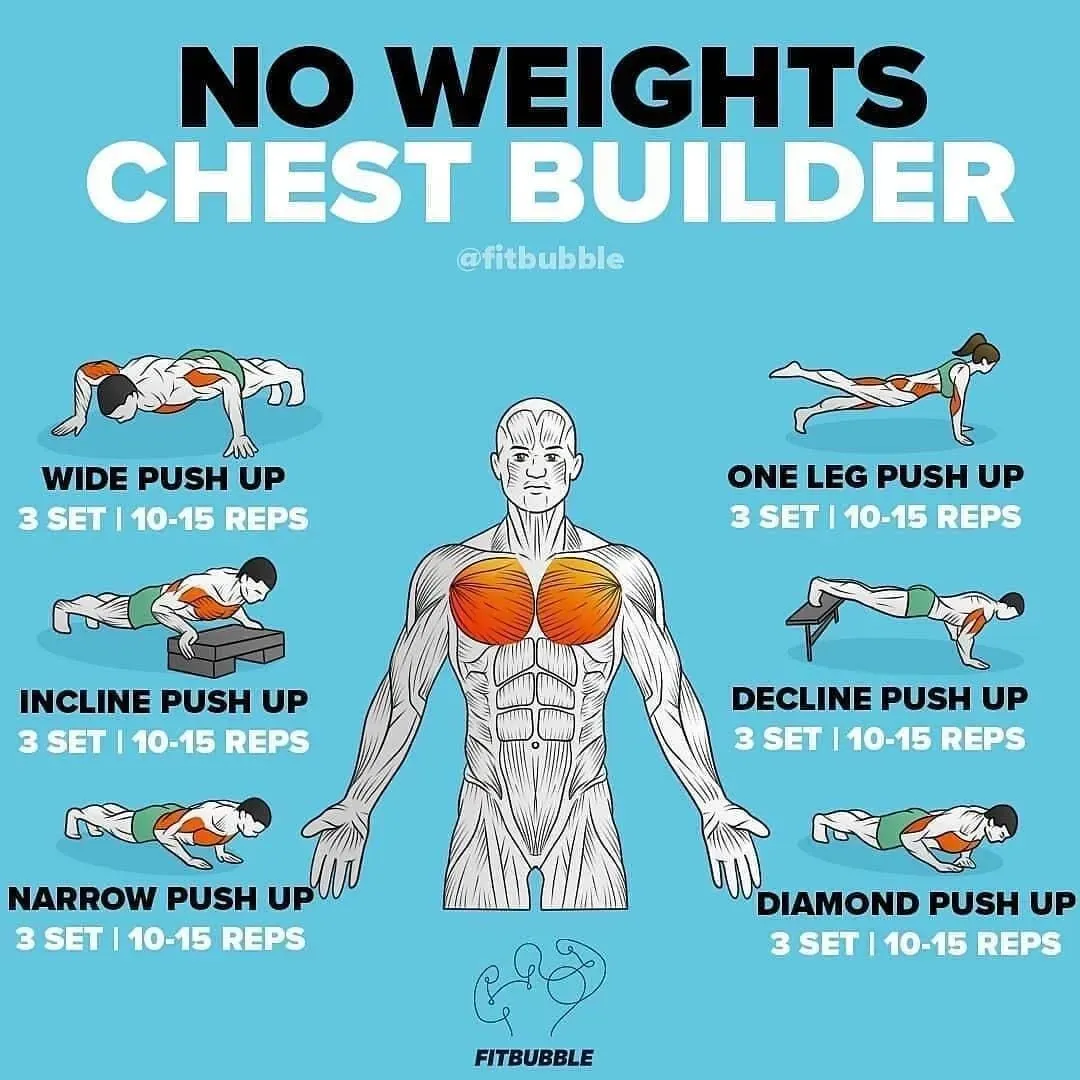
Common Push-Up Variations to Try:
- Standard Push-Up
- Incline Push-Up (Hands elevated)
- Decline Push-Up (Feet elevated)
- Diamond Push-Up
- Wide-Grip Push-Up
Effective Back Moves for Your Chest and Back Workout At Home No Equipment

Effective Back Moves for Your Chest and Back Workout At Home No Equipment
Finding Your Pull: The Inverted Row
chest gets a lot of love with push-ups, but the back can feel like the neglected stepchild in a chest and back workout at home no equipment scenario. How do you pull without a bar? Enter the inverted row. Find a sturdy table, a railing, or even two strong chairs with a broomstick across them (test that setup *carefully* first). Get underneath, grab the edge (or bar) with an overhand or underhand grip, and hang with your body straight. Pull your chest up towards the table/bar, squeezing your shoulder blades together at the top. Lower yourself back down with control. This is your fundamental horizontal pull, hitting your lats, rhomboids, and biceps. It's deceptively simple but incredibly effective for building that upper back thickness that balances out all those push-ups.
Setting Up Your Inverted Row:
- Find a stable horizontal edge (table, counter, railing).
- Ensure it can support your body weight without moving or breaking.
- Position yourself underneath, hands gripping the edge.
- Keep your body straight from head to heels.
- Pull your chest towards the edge, focusing on back muscle contraction.
Making it Harder: Angles and Tempo
Just like with push-ups, you can tweak inverted rows to change the difficulty for your chest and back workout at home no equipment. The more horizontal your body is (i.e., the lower the table or the further your feet are extended), the harder it gets. If you're just starting, a higher surface or bending your knees can make it more manageable. To really challenge your back, try pausing at the top of the movement for a second or two, squeezing hard. You can also play with grip width – wider grips can emphasize the lats slightly more, while narrower grips work the mid-back and biceps. Don't just rush through the reps; feel the muscles doing the work. Quality over quantity, especially when you're figuring out how to pull effectively without a gym.
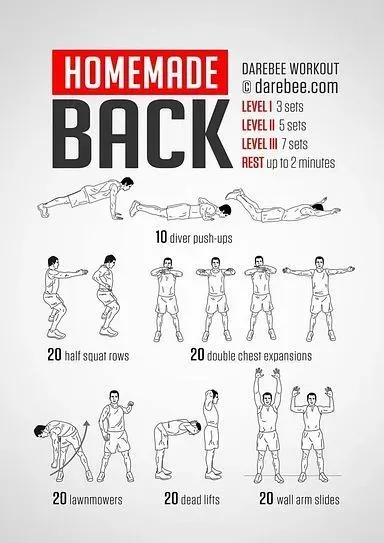
Beyond the Row: Bodyweight Back Activation
While the inverted row is your main event for pulling in a chest and back workout at home no equipment, don't forget about activation and smaller movements. Things like 'supermans' (lying face down and lifting your chest and legs off the floor) are great for hitting the lower back and spinal erectors. 'Scapular push-ups' (in a plank position, just moving your shoulder blades together and apart without bending your elbows) can improve shoulder blade control, which is crucial for healthy shoulders and effective pulling. These might not feel as intense as rows or push-ups, but they play a vital role in warming up the right muscles and improving overall back health and function. Incorporating these little things makes a big difference in the long run.
Crafting Your Full Chest and Back Workout At Home No Equipment Routine
Crafting Your Full Chest and Back Workout At Home No Equipment Routine
Putting the Pieces Together: Structuring Your Session
Alright, you've got the moves – push-ups for the chest, inverted rows for the back. Now, how do you weave them into a complete chest and back workout at home no equipment session that actually gets results? It's not just about doing a bunch of random exercises. Think structure. You want to hit both muscle groups effectively without completely burning out on one before you get to the other. A common approach is to alternate between a chest exercise and a back exercise. This allows one muscle group to recover slightly while the other is working. For instance, you could do a set of push-ups, rest, then do a set of inverted rows, rest, and repeat.
How many sets and reps? That depends on your goals. If you're aiming for strength and muscle growth (hypertrophy), aim for 3-4 sets of 8-15 repetitions for each exercise. If you're focusing more on endurance, you might go for higher reps, say 15-25+. The key is to choose a variation of the exercise that challenges you within that rep range. If you can easily do 20 standard push-ups, elevate your feet. If you struggle with 5 inverted rows, find a higher table. Listen to your body, but push yourself. The last couple of reps in each set should feel tough, like you're really working for them.
Making Progress and Staying Consistent
Doing a chest and back workout at home no equipment once is a start, but consistency is where the magic happens. Aim to hit these muscle groups 2-3 times per week, allowing at least a day of rest in between for recovery. Your muscles don't grow while you're working out; they grow while you're resting and recovering. As you get stronger, you'll need to make the exercises harder. This is called progressive overload. You can do this by increasing the number of reps, adding more sets, slowing down the tempo of each rep, decreasing rest time between sets, or moving to a more challenging variation of the exercise (like going from incline push-ups to standard, or standard to decline).
Don't get discouraged if progress feels slow sometimes. Everyone hits plateaus. When that happens, try changing something up – maybe swap the order of exercises, add a different variation you haven't tried, or focus on perfecting your form even more. The goal is continuous challenge. Your body adapts pretty quickly, so you need to keep giving it new reasons to get stronger. Remember, the best chest and back workout at home no equipment is the one you actually do consistently and progressively overload.
Workout Structure Example:
- Warm-up (5-10 minutes of dynamic stretches)
- Set 1: Standard Push-ups (as many challenging reps as possible)
- Rest (60-90 seconds)
- Set 1: Inverted Rows (as many challenging reps as possible)
- Rest (60-90 seconds)
- Repeat for 3-4 total sets of each exercise.
- Optional: Add a set of Diamond Push-ups or Decline Push-ups.
- Optional: Add a set of Supermans or Scapular Push-ups.
- Cool-down (5 minutes of static stretching)
Finishing Strong: Your At-Home Chest and Back Progress
So, you've seen that building a solid chest and back doesn't require a gym membership or expensive gear. Using your own bodyweight for a chest and back workout at home no equipment is more than just a temporary fix; it's a legitimate path to strength and muscle. Consistency is the real secret here. Don't expect overnight transformations, but stick with a smart routine, focus on proper form over speed, and progressively challenge yourself. Your living room can be your gym, and your body is all the equipment you need to see real results.