
Table of Contents
Thinking about building a stronger chest but gym trips aren't happening right now? You're not alone. Life gets busy, and sometimes fitting in a gym session feels impossible. That doesn't mean your chest goals have to take a backseat. In fact, you can get a killer chest workout right in your living room, and having a solid chest workout at home chart can make all the difference.
Why a Chest Workout at Home Chart Matters
Why a Chest Workout at Home Chart Matters
Ditch the Commute, Keep the Progress
Look, getting to the gym is a hurdle for a lot of people. Traffic, membership fees, feeling like you're on display – it adds up. But wanting a stronger chest doesn't suddenly disappear because you can't make it to the squat rack. That's where having a clear, actionable chest workout at home chart becomes your secret weapon. It cuts out all the excuses. You wake up, roll out of bed (maybe stretch first, please), and your plan is right there. No thinking, no debating, just doing. It brings structure to what could otherwise be a chaotic, "what do I even do now?" situation.
Having a chart isn't just about convenience, though. It's about intentionality. When you follow a chest workout at home chart, you're not just doing random push-ups until you get bored. You have a planned progression, specific exercises targeting different angles of your chest, and a way to track your sets and reps. This structured approach is crucial for seeing actual results. It’s the difference between aimlessly wandering and following a map. You know where you started, where you're going, and you can see how far you've come. It makes that effort feel purposeful, not just like you're flailing around on the floor.
- Saves time and money compared to a gym membership.
- Provides a clear plan, removing guesswork.
- Helps track progress over time.
- Allows for consistent training regardless of schedule.
- Empowers you to take control of your fitness anywhere.
Essential Warmups Before Your Home Chest Session
Essential Warmups Before Your Home Chest Session
Why Bother Warming Up? Don't Skip This Part
Alright, before you drop down and attempt your first push-up from your chest workout at home chart, let's talk warm-ups. I get it, you're eager to get to the main event, the chest pump. But think of your body like an old car on a cold morning. You wouldn't just floor it, would you? You let it warm up a bit. Skipping the warm-up is a surefire way to invite unwelcome guests like strains and tweaks, especially in your shoulders and elbows, which take a beating during chest work. A proper warm-up gets blood flowing, increases muscle elasticity, and primes your joints for the movement patterns you're about to perform. It’s not just busywork; it’s damage control and performance enhancement rolled into one.
Getting Your Joints Ready: Dynamic Movements
So, what does a "proper" warm-up look like for a home chest session? Forget static stretching where you just hold a pose. That's better saved for after your workout. Before you lift (or push, in this case), you need dynamic movements. These are controlled movements that take your joints through their full range of motion. Think arm circles, shoulder rotations, and maybe some light torso twists. The goal is to gently increase your heart rate and loosen up the muscles and connective tissues around your shoulder girdle and chest. You should feel a bit warmer, maybe slightly out of breath, but definitely not fatigued. This phase is about preparation, not perspiration.
Warm-up Move | Focus Area | Why Do It? |
|---|---|---|
Arm Circles (forward/backward) | Shoulders, Upper Back | Increases shoulder mobility and blood flow. |
Shoulder Rotations | Shoulder Joint | Primes the rotator cuff muscles. |
Torso Twists | Upper Back, Core | Loosens spine and improves core readiness. |
Specific Prep for Pushing Power
Beyond general mobility, adding a few movements that mimic the exercises on your chest workout at home chart is smart. Light scapular push-ups (just moving your shoulder blades while in a plank or push-up position) help activate the stabilizing muscles around your shoulders. Gentle cat-cow stretches can loosen up your upper back and improve thoracic mobility, which is crucial for getting into good push-up positions. You might also do a few very easy knee push-ups, focusing purely on form and feeling the muscles engage, not pushing to failure. This prepares your nervous system and muscles for the actual work ahead. Spend about 5-10 minutes on this whole warm-up sequence. It’s a small investment for a much safer and more effective workout.
Your GoTo Exercises for a Chest Workout at Home Chart

Your GoTo Exercises for a Chest Workout at Home Chart
The Humble Push-Up: Your Foundation
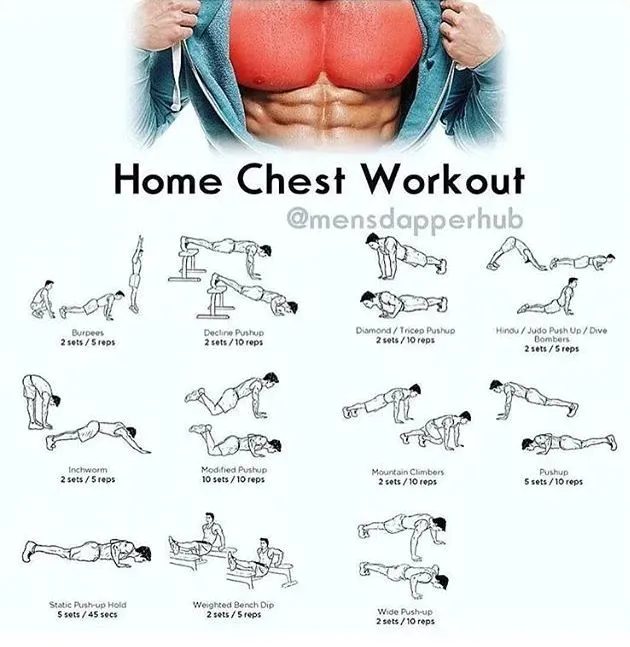
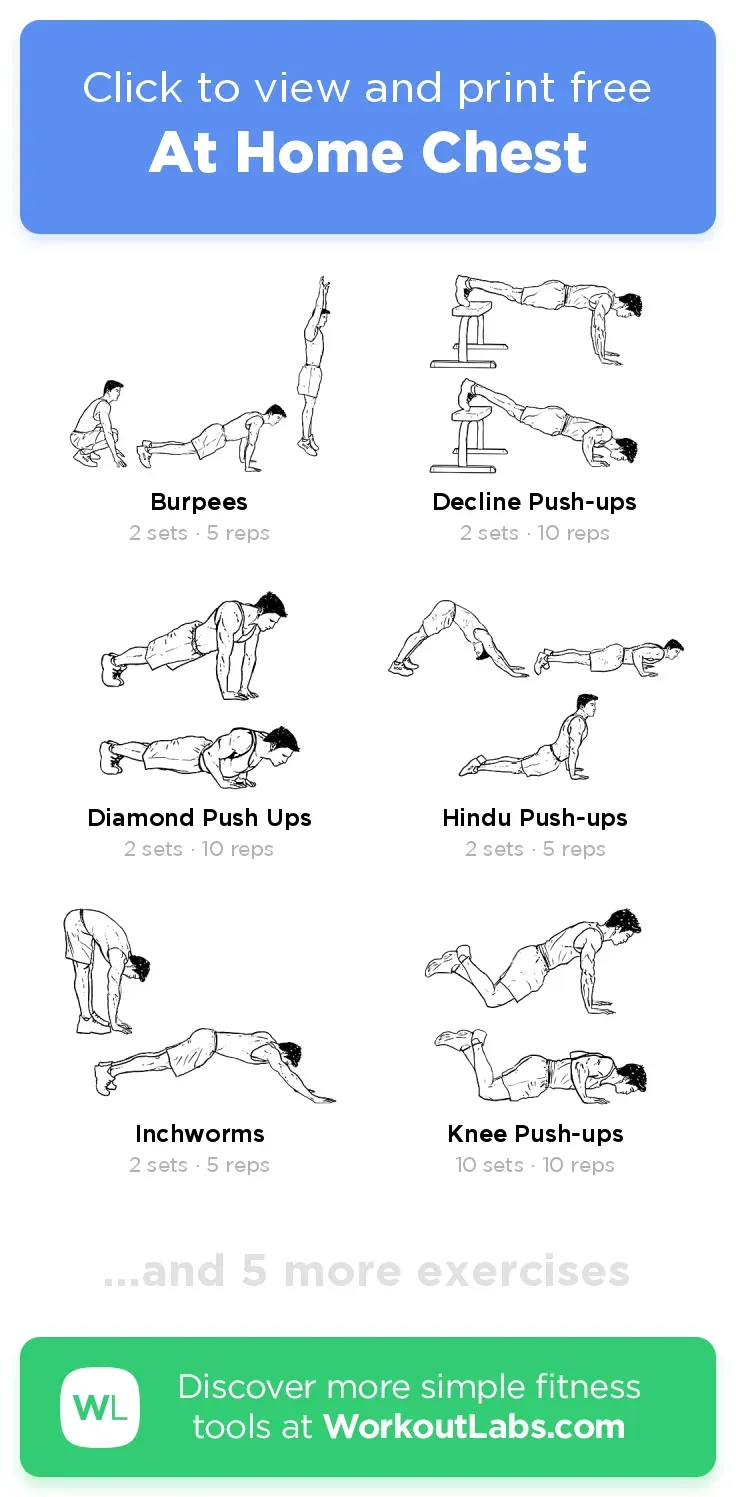
let's get to the meat and potatoes of your chest workout at home chart: the push-up. Seriously, don't underestimate this classic. It's the cornerstone of bodyweight chest training for a reason. It hits your chest, shoulders, and triceps all at once, and you can do it anywhere. Start with the basic push-up position: hands slightly wider than shoulder-width, fingers pointing forward, body in a straight line from head to heels. Lower your chest towards the floor, keeping your elbows from flaring out too wide (think a 45-degree angle relative to your body), and then push back up. Focus on squeezing your chest at the top. The key here is control, not speed. If full push-ups are too tough right now, drop to your knees. There's zero shame in starting there. Build strength and perfect the form before moving to your toes.
Variations to Hit Every Angle
Once you've got the standard push-up down, your chest workout at home chart gets exciting with variations. Want to target your inner chest? Diamond push-ups, with your hands close together under your chest forming a diamond shape, are brutal in the best way. Looking to work the upper chest? Elevate your feet on a chair or couch for decline push-ups. For the lower chest, incline push-ups with your hands on an elevated surface (like a sturdy table or counter) work wonders. Each slight change in hand position or body angle shifts the emphasis, ensuring you're building a well-rounded chest, not just strong in one plane. Don't just pick one; mix and match these in your chart to keep challenging your muscles.
Push-Up Variation | Primary Focus | Difficulty (Relative) |
|---|---|---|
Standard Push-Up | Overall Chest, Triceps, Shoulders | Beginner to Intermediate |
Diamond Push-Up | Inner Chest, Triceps | Intermediate to Advanced |
Incline Push-Up | Lower Chest | Beginner |
Decline Push-Up | Upper Chest | Intermediate to Advanced |
Adding Intensity and Other Moves
Bodyweight doesn't mean easy forever. To keep progressing on your chest workout at home chart, you need to increase the intensity. Slower negatives (taking several seconds to lower yourself) or isometric holds (pausing halfway down) can make standard push-ups much harder. If you have resistance bands, loop one around your back and hold the ends in your hands during push-ups for added resistance at the top. While push-ups are king, don't forget other moves. Plank variations, especially those involving shoulder taps, work your chest as a stabilizer and hit your core simultaneously. If you have a sturdy chair, dips (though primarily triceps) also engage the lower chest significantly. The goal is to keep your muscles guessing and growing.
Crafting Your Personal Chest Workout at Home Chart

Crafting Your Personal Chest Workout at Home Chart
Finding Your Starting Point (No, Seriously, Be Honest)
so you've got the warm-up down and a bunch of potential exercises in mind. Now, how do you actually pull it together into a usable chest workout at home chart? The first, and arguably most important, step is being brutally honest about where you are *right now*. Can you do ten perfect push-ups on your toes? Awesome. Can you barely manage one? Also awesome, because everyone starts somewhere. Trying to jump into an advanced routine because some ripped influencer does it is a fast track to frustration and injury. Test yourself. See how many *good form* reps you can do of basic push-ups (on knees or toes), incline push-ups, maybe even diamond push-ups if you're feeling brave. This isn't about ego; it's about building a sustainable plan. Your chart needs to reflect your current ability, not some future aspiration you hope to achieve next week. That future aspiration comes from consistent work starting *today* at your actual level.
Putting the Pieces Together: Sets, Reps, and Frequency
With your starting point established, you can begin to assemble your chest workout at home chart. A good rule of thumb for building muscle is aiming for 3-4 sets per exercise. The number of reps per set will depend on your current strength level and the exercise difficulty. If you can do more than 15-20 reps easily, it's time to try a harder variation or add intensity (like slower negatives). If you're struggling to hit 5-8 reps, stick with an easier variation or reduce the number of sets initially. Don't be afraid to mix variations within a single workout – start with a harder one like decline push-ups, then move to standard, and finish with incline to really fatigue the muscle from different angles. As for frequency, hitting your chest 2-3 times per week is generally sufficient for growth, provided you allow a rest day in between for recovery. Write it down: Exercise, Sets, Reps, and the days you plan to train. This is your working chest workout at home chart.
- Assess your current push-up ability (on knees and toes).
- Choose 3-4 exercises from the variations list based on your level.
- Plan for 3-4 sets per exercise.
- Select a rep range (e.g., 8-15 reps) that challenges you while maintaining good form.
- Decide on your training frequency (e.g., Monday, Thursday).
- Write it all down – this is your first draft of the chest workout at home chart.
- Review and adjust weekly based on progress.
Beyond the Chart: Consistency and Progression

Beyond the Chart: Consistency and Progression
Showing Up is Half the Battle (The Other Half is Pushing)
Alright, you’ve got your shiny new chest workout at home chart. It looks great on paper, maybe even taped to your fridge. But here’s the cold, hard truth: the chart itself won’t build your chest. Consistency does. Skipping workouts because you’re tired, busy, or just don't feel like it is the quickest way to ensure that chart gathers dust and your chest stays exactly the same. It sounds simple, annoyingly simple, but showing up for your scheduled sessions, even when motivation is low, is non-negotiable. Treat these home workouts like appointments you can't reschedule. That consistent effort, week after week, is what forces your muscles to adapt and grow. Your chest workout at home chart is a tool, but you're the one who has to wield it.
Tracking Progress: Are You Getting Stronger?
So, how do you know if all this showing up is actually doing anything? You track your progress. This is where your chest workout at home chart evolves from a static plan to a living document. Write down the number of reps you did for each set, and how challenging it felt. Did you manage an extra rep on your second set of diamond push-ups? Did that last set of decline push-ups feel slightly less soul-crushing than last week? These small victories are indicators of progress. Don't just go through the motions; pay attention to what your body is doing. If you're consistently hitting the top end of your rep range with good form, it’s a clear signal it’s time to make things harder.
Date | Exercise | Set 1 | Set 2 | Set 3 | Notes (e.g., felt easy, struggled on last rep) |
|---|---|---|---|---|---|
[Date] | Standard Push-ups | 10 reps | 9 reps | 8 reps | Getting easier, try 1 more next time |
[Date] | Incline Push-ups | 15 reps | 15 reps | 14 reps | Ready for a harder variation soon? |
Avoiding Plateaus: How to Keep Challenging Yourself
Muscles are lazy. As soon as they figure out how to handle the load you're giving them, they stop working so hard, and your progress grinds to a halt. This is a plateau, and it's frustrating. Your chest workout at home chart needs built-in ways to combat this. Once an exercise feels easy, you need to increase the difficulty. This could mean moving to a harder push-up variation (from knees to toes, or incline to standard). It could mean increasing the number of reps or sets. Or, it could involve adding intensity techniques like slower negatives, pause reps, or even trying explosive push-ups if you're advanced enough and have soft landings available. Regularly reviewing your progress notes helps you decide when and how to adjust your chart to keep the challenge coming. Remember, growth happens outside your comfort zone, even if that zone is currently your living room floor.
The Final Rep on Your Home Chest Chart
So there you have it. Building a strong chest doesn't require a membership fee or waiting for a bench press to open up. A well-structured chest workout at home chart, combined with consistent effort, is more than enough to challenge your muscles and see progress. Remember, the chart is just the blueprint; the real work happens when you show up, day after day, even when you don't feel like it. Stop making excuses and start pressing.