Table of Contents
Look, let's be real. Getting to the gym can feel like launching a rocket sometimes – too much effort, too many variables. Maybe you're short on time, maybe memberships cost more than your rent, or maybe you just can't stand the guy who grunts too loud by the free weights. Whatever the reason, skipping chest day isn't the answer. The good news? You absolutely can build a strong, defined chest without leaving your living room. Forget the fancy machines and crowded benches. This guide is all about effective chest workouts at home.
Why Start Chest Workouts at Home?
Why Start Chest Workouts at Home?
Ditch the Commute and Save Some Cash
Let's be honest, getting to the gym is a whole production. Packing a bag, fighting traffic, finding parking – it all adds up. Starting your chest workouts at home immediately cuts out all that wasted time and hassle. You roll out of bed, grab a water bottle, and you're practically there. Plus, you save a significant chunk of change on membership fees, gas, and overpriced protein shakes. It's pure efficiency. I remember when I used to drive 20 minutes each way just for a quick session; now I get the same work done, or better, in my living room during a commercial break. Talk about a game-changer.
Effective Results Are Within Reach
Maybe you think you need heavy barbells and fancy machines to build a strong chest. That's a common myth. Your bodyweight is a powerful tool. Push-ups, in their many variations, are incredibly effective for hitting your pecs, shoulders, and triceps. You can easily adjust the difficulty to keep challenging yourself as you get stronger. Adding simple, inexpensive equipment like resistance bands or a pair of dumbbells opens up even more possibilities. Don't underestimate what you can achieve with consistent, smart training right where you are. The pump is real, even without the crowded weight rack.
- Save time and money
- Exercise on your own schedule
- Plenty of effective bodyweight options
- Adaptable to different fitness levels
- No waiting for equipment
Train on Your Terms, Build Consistency
Training at home offers a level of privacy and control you just don't get elsewhere. No judging eyes, no waiting for equipment, no awkward small talk. You control the music, the temperature, and the pace. This comfort makes it much easier to stay consistent. Life happens – unexpected meetings, sick kids, bad weather. When your gym is just down the hall, it's much harder to skip a session. Consistency is the true secret to seeing results with chest workouts at home or anywhere else, and the convenience of home training makes sticking to a routine much more likely.
Prep Your Pecs: Essential Warmups for AtHome Chest Sessions
Prep Your Pecs: Essential Warmups for AtHome Chest Sessions
Alright, before you drop down and start pounding out push-ups like your life depends on it, pump the brakes for a second. Skipping the warm-up before yourchest workouts at homeis like trying to start a cold engine and immediately redlining it – things are gonna break. You need to get blood flowing to those muscles, loosen up your joints, and prime your nervous system. This isn't just about preventing a nasty pull or strain that sidelines you for weeks; a proper warm-up actually makes your workout more effective. Think of it as telling your body, "Hey, we're about to do some work here, let's get ready." Five to ten minutes is all it takes to make a massive difference in how your chest feels and performs during the main event.
- Arm Circles (forward and backward)
- Shoulder Rolls
- Thoracic Rotations (twist your upper back gently)
- Cat-Cow Stretch
- Light dynamic push-ups (on knees or against a wall)
Your GoTo Moves for Effective Chest Workouts at Home
Your GoTo Moves for Effective Chest Workouts at Home
The Underrated Power of the Simple Push-Up
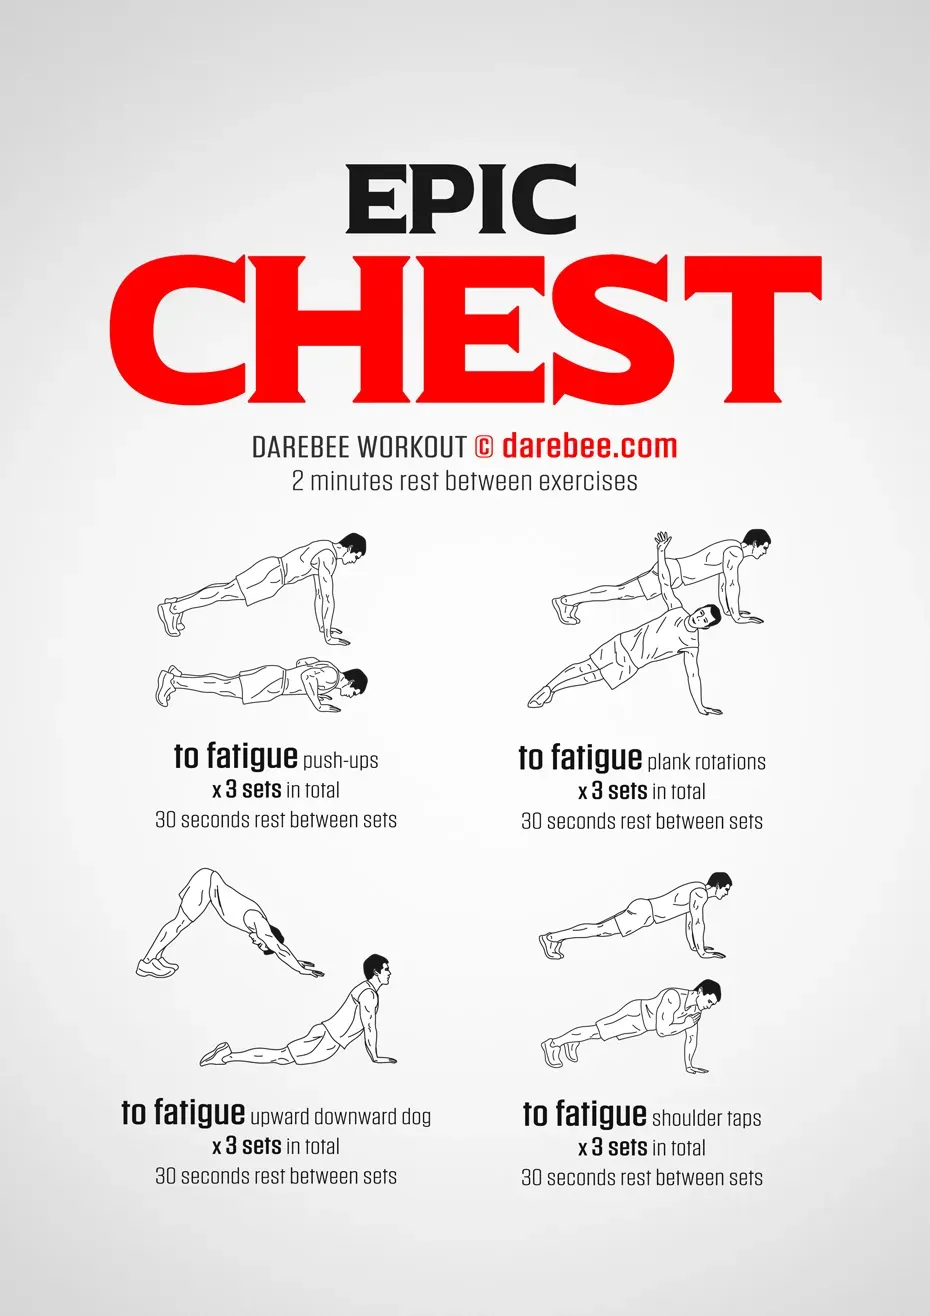
Alright, let's get down to the brass tacks of building that chest at home. Forget the fancy machines you see on infomercials. The foundation of any solid home chest routine, and frankly, most chest routines anywhere, is the humble push-up. Yes, the move you probably did in gym class. But don't let its simplicity fool you. A proper push-up is a compound exercise hitting your chest, shoulders, and triceps all at once. Getting good at these should be your first mission. Start on your knees if you need to, or against a wall. The goal is controlled movement: chest to the floor (or as low as you can go with good form), then press back up, keeping your body straight like a plank. Don't rush it. Feel the muscle working. Master the basic form before you do anything else. It’s the bread and butter ofchest workouts at home.
Targeting Angles with Push-Up Variations
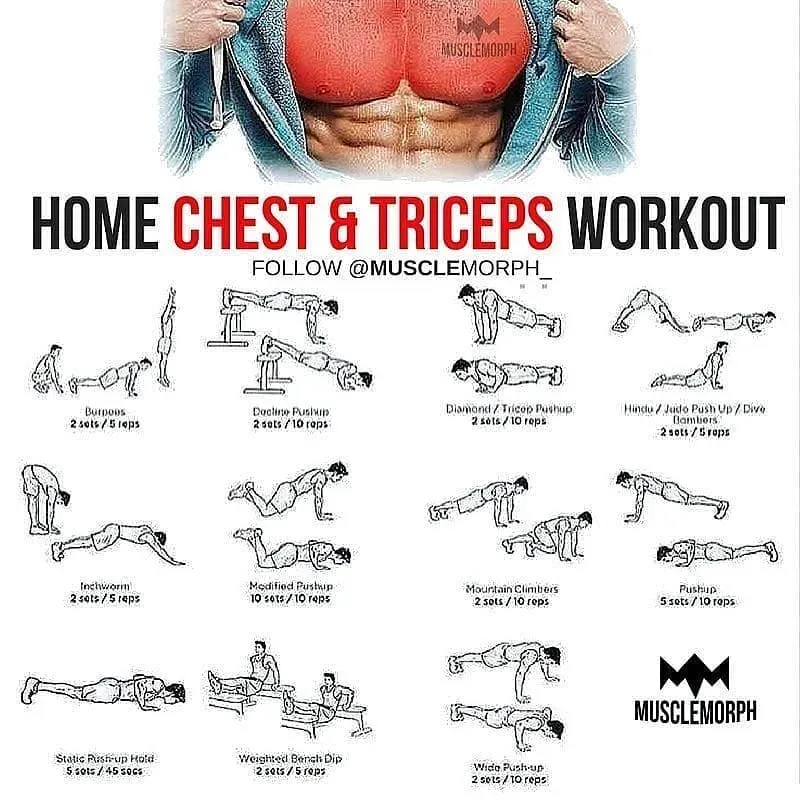
Once you've got the standard push-up locked down, it's time to play with angles. This is where bodyweight training gets interesting and allows you to hit different parts of your chest. Want to work the lower chest? Elevate your hands on a sturdy chair, coffee table, or even a stack of books for incline push-ups. This makes the movement easier and targets those lower pec fibers. Looking to hammer the upper chest? Elevate your feet on that same chair or surface for decline push-ups. These are tougher and put more emphasis on the upper chest and shoulders. Diamond push-ups, with your hands close together forming a diamond shape under your chest, absolutely light up the inner chest and triceps – prepare for a serious burn with those. Changing your hand width also shifts the focus; wider hits the outer chest more, narrower works the triceps and inner chest.
Push-Up Variation | Primary Focus | How to Adjust Difficulty |
|---|---|---|
Standard Push-up | Overall Chest, Shoulders, Triceps | Elevate hands (easier) or feet (harder) |
Incline Push-up | Lower Chest | Higher elevation of hands = easier |
Decline Push-up | Upper Chest, Shoulders | Higher elevation of feet = harder |
Diamond Push-up | Inner Chest, Triceps | Perform on knees (easier) |
Beyond the Push-Up: Adding Resistance and Isolation
While push-ups are king, they aren't the only game in town for effectivechest workouts at home. If you have a pair of dumbbells, even light ones, you open up a new world. Floor presses are a fantastic alternative to bench press; lie on your back, feet flat, and press the weights straight up. Floor flies, performed similarly but with a sweeping motion like you're hugging a barrel, isolate the chest muscles beautifully. No dumbbells? Resistance bands are your best friend. Anchor a band around a sturdy object or under your back and perform presses or flies. You can even use household items – fill milk jugs or backpacks with books for makeshift weights. The point is to get creative with adding resistance as you get stronger. Isometric holds, like pausing at the bottom of a push-up, can also add intensity and build strength in different ways. Don't limit yourself; look around your space and see what tools you already have.
Taking Your AtHome Chest Training to the Next Level
Taking Your AtHome Chest Training to the Next Level
Adding Intensity and Progression
So you've mastered the basic push-ups, you're crushing variations, and you're feeling pretty good about your chest workouts at home. Now what? Don't get comfortable. Progress is the name of the game. To keep seeing gains, you need to keep challenging your muscles. This doesn't necessarily mean doing a thousand push-ups. It means making the exercises harder. You can increase the reps or sets, sure, but that only goes so far. A better approach is to increase the *difficulty* of the movement. Think about adding a pause at the bottom of your push-up (isometric hold), doing explosive push-ups where your hands leave the floor, or trying single-arm variations (even if it's just a partial range of motion at first, assisted by your other hand). Elevate your feet higher for decline push-ups. If you have weights or bands, increase the resistance gradually. Time under tension is also key – slow down the lowering phase of your push-ups to a count of three or four. Your muscles don't count reps; they respond to stress and time under tension.
Listen to Your Body and Stay Consistent
Pushing yourself is important, but recovery is where the magic actually happens. Your muscles grow when you're resting, not when you're tearing them down. Don't try to do intense chest workouts at home seven days a week. Your body needs time to repair and rebuild. Aim for 2-3 chest sessions per week, with at least a day of rest in between. Listen to your body – if something feels like sharp pain, stop. Soreness is normal; injury is not. Proper nutrition and sleep are just as crucial as the exercises themselves; you can't build a brick wall without bricks and a good night's sleep for the builder. Stay consistent with your training schedule, even when life gets hectic. Ten minutes of focused work is better than skipping altogether. Remember, building a strong chest at home is a marathon, not a sprint. Enjoy the process and the feeling of getting stronger right where you are.
- Increase exercise difficulty (explosive, pauses, single-arm variations).
- Slow down movement speed for more time under tension.
- Gradually increase weight or band resistance.
- Allow for adequate rest (2-3 sessions/week).
- Prioritize nutrition and sleep for recovery.
- Be consistent, even with shorter workouts.
Your At-Home Chest Game Plan
So there you have it. Building a capable chest doesn't require a gym membership or a truckload of expensive equipment. We've covered why hitting your chest at home is viable, the crucial warm-up steps you shouldn't skip, and a roster of exercises from basic push-ups to slightly more creative options. Consistency is the real secret sauce here, along with paying attention to your form. It won't happen overnight, and there will be days you don't feel like it. But stick with it, use the space you have, and you'll find those chest muscles responding. No commute, no waiting for equipment, just you and your workout. Go get after it.